This module addresses the correct means for responding to an objection to a claim. As you will see, this action is accomplished utilizing the general answer or response to a motion process.
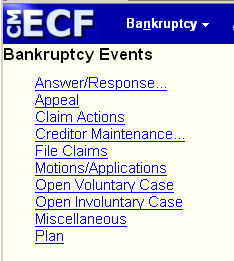
STEP 1 From the Main Menu, select Bankruptcy (See Figure 1.)
Figure 1
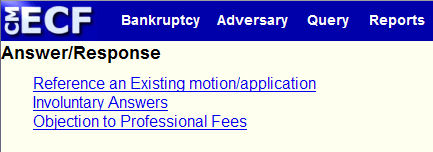
STEP 2 From the Bankruptcy Events menu, select Answer/Response... (See Figure 2.)
Figure 2
STEP 3 The Answer/Response menu appears. (See Figure 3.)
Figure 3
- Select/click on Reference an Existing motion/application.
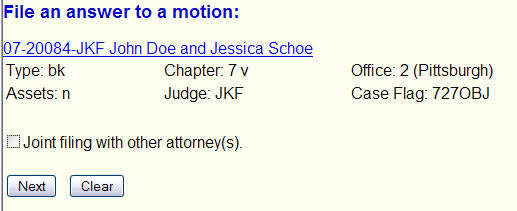
STEP 4 The Case Number screen appears. (See Figure 4.)
Figure 4
- If the box is blank, enter the correct case number.
(The case number is entered in regular format: YY-NNNNN : 07-20084)- If the box displays a case number, verify that it is the correct number. If not, enter the
correct case number.- Click on the [Next] button to continue.
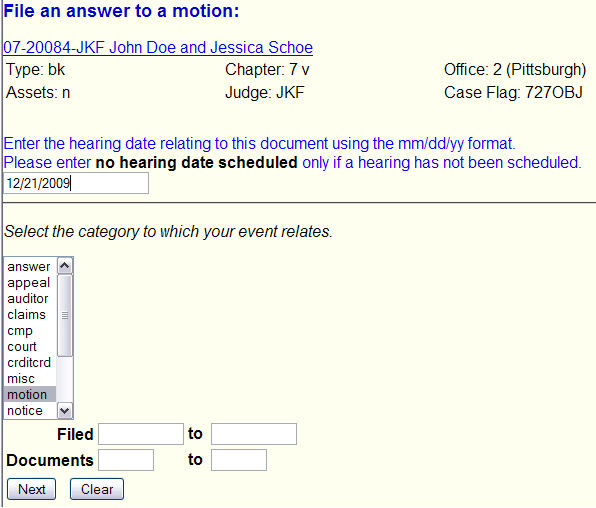
STEP 5 The Select Event screen appears. (See Figure 5.)
Figure 5
- Verify that you are in the correct case by checking the case number and case name.
- If wrong case, use the Browser's BACK button to return to the Case Number prompt screen
and enter the correct case number.- Click on the "Response" entry in the Available Events list to add it to the Selected Events box.
- Click on the [Next] button to continue.
STEP 6 The Joint filing with other attorney(s) screen will display. (See Figure 6.)
Figure 6
- Do not select any additional attorneys.
- Click on the [Next] button to continue.
STEP 7 The Select the Party screen will display. (See Figure 7.)
Figure 7.
- Find your client(s) on the Party list and select them.
- Click on the [Next] button to continue.
STEP 8 The Select the PDF document screen will then display. (See Figure 8.)
Figure 8.
- See the Browse Process to identify the file containing your Response.
- If you have additional PDF files to complete this filing, change Attachments to Document to Yes.
(See the Attachment Process for details on attaching files.)
- Click on the OK button to continue.
STEP 9 The Enter a hearing date and Docket filter screen is displayed. (See Figure 9.)
Figure 9.
- Enter the hearing date, or if hearing not set yet, enter "no hearing date scheduled".
- Use the Select the category ... section to filter in a small portion of the docket.
(See the Select the Category process for details on this step.)
- Click on the Next button to continue.
STEP 10 The selected portion of the docket is displayed. (See Figure 10.)
Figure 10.
- Since I did not specify a date or document number range, all docket entries from the Motions category (I have excluded some for brevity's sake).
- Scan down looking for the Objection to Claim entry you are responding to. In this example, #63.
- Click in the Include box of the appropriate Objection to Claim entry.
- Click on the Next button to continue.
STEP 11 The Modify Docket Text screen is displayed. (See Figure 11.)
Figure 11.
- We did not have an attachment in this example. But if you did have an attachment,
verify that attachment(s) is referenced in the docket text.
- Note the event we are responding to is embedded in the docket text - #63 in this example.
- No enhancement needed.
- Verify all text shown is complete and correct. If not, go back and correct.
- Click on the Next button to continue.
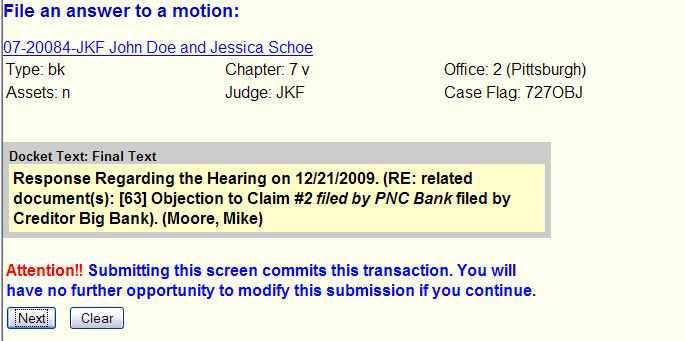
STEP 12 The Final Docket Text screen is displayed. (See Figure 12.)
Figure 12.
- Verify that all information is complete and correct. If something is missing or
incorrect, use your Browser's BACK button to return to the appropriate screen(s)
to add and/or correct data.
- Click on the Next button to continue.
STEP 13 The Notice of Electronic Filing is displayed. (See Figure 13.)
Figure 13.
- The screen verifies that the Response to Objection to Claim has been uploaded and filed.
- To print a copy of this notice, click the browser [Print] button or icon.
- To save a copy of this receipt, click [File] on the browser menu bar and select Save Frame As.
Return to the Topics in Alphabetical Order page.
Text Size: