This module covers the filing of an Amended Complaint to add additional defendants to an adversary case. Notes pertaining to other amending actions are included.
STEP 1 Click the Adversary hyperlink on the CM/ECF main menu bar. (See Figure 1.)
![]()
Figure 1
STEP 2 Select Complaint & Summons from the Adversary Events menu. (See Figure 2.)
Figure 2
STEP 3 Next, enter the adversary case number.(See Figure 3.)
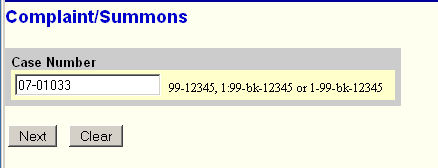
Figure 3
- If a case number appears, verify and correct if necessary.
- If blank, enter adversary case number,
- Click the [Next] button to continue.
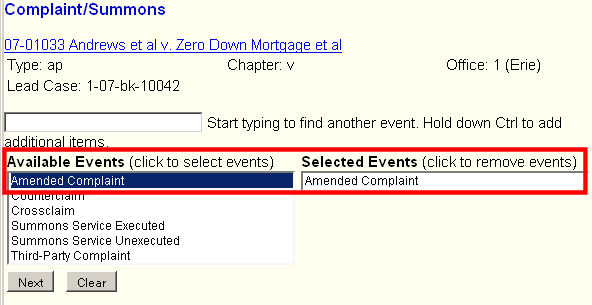
STEP 4 Select Amended Complaint from the event list.
(See Figure 4.)
Figure 4
- Even though "Amended Complaint" comes up already highlighted in the Available Events box, you must still click on it to make it appear in the Selected Events box.
- Click on the Next button to continue.
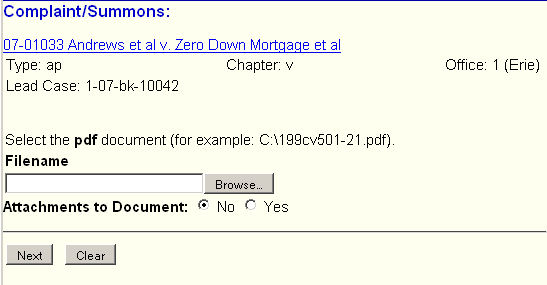
STEP 5 On the “Select the pdf document” screen, browse to the pdf file containing the amended complaint.
(See Figure 5.)
(Figure 5)
- Use the Browse button to locate the pdf file containing the amended complaint.
See the Browse Process module for details on this action.
- If pertinent, attach any additional pdf file(s).
See that Attachment Process module for details on this action.
- Click on the Next button to continue.
STEP 6 The “Please select the party this filing is against” is displayed.
(See Figure 6.)
Figure 6
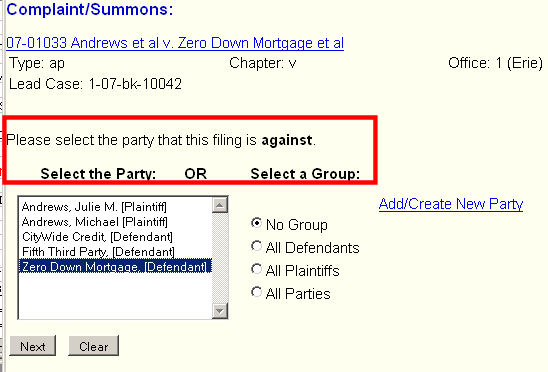
-
Click on the “Add/Create New Party” link to add parties to the case.
In this example, we are adding Fifth Third Bank as a defendant.
See the Search Process for more detail on searching and adding parties.
When entering the data for a newly added defendant or plaintiff, identify the role that party plays in the related Bankruptcy case.
-
If the amendment impacts all defendants, plaintiffs or parties, select the appropriate entry in the
Select a Group list.
If adding plaintiffs and/or defendants, leave as “No Group” and insure that all parties to be added are highlighted in the Select the Party box.
- Click on the Next button to continue.
STEP 7 On the “Select the Party” screen, select your client(s). (See Figure 7.)
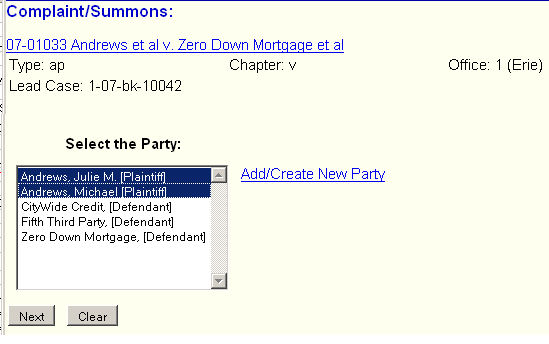
Figure 7
-
Your client(s) will be in the Party list, so highlight them.
(Use the ctrl-click technique to select multiple clients.)
In this example, we would select both defendants – Julie and Michael Andrews.
- Click on the Next button to continue
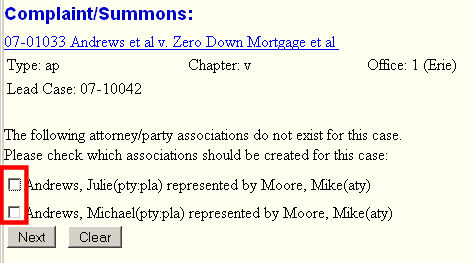
NOTE: If adding plaintiffs, the system will ask if you wished to associate yourself with those parties since you had not yet done so. You would always check the box(es). (See Figure 7a.)
Figure 7a
- Then click the Next button to continue.
STEP 8 Click in the box indicating that this amended complaint does refer to an existing event. (See Figure 8.)
Figure 8
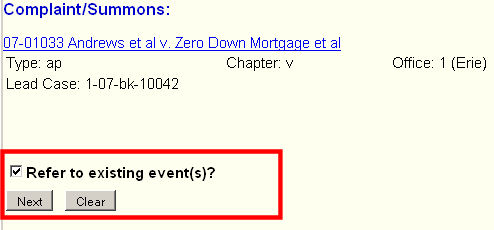
- Here we indicate that this action/event refers to an existing event in that it is amending that event – in this case, the original complaint.
- Check the box and then click on the Next button.
STEP 9 On the “Select the category …” screen, drag-select all the categories as the " category" since amending complaints is not included in the list. (See Figure 9.)
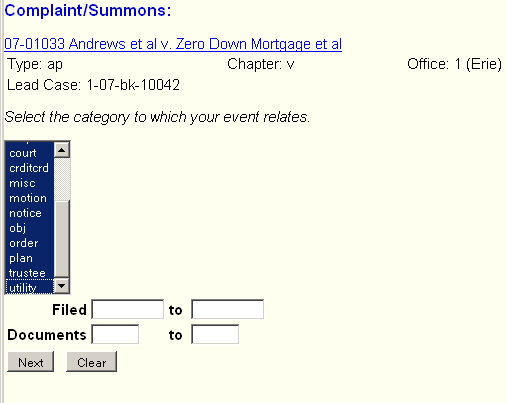
Figure 9
- Select all categories by drag-selecting them;.
Drag-Selecting refers to positioning the mouse pointer over first entry in the list, pressing and holding down left mouse button, then dragging the mouse pointer down the list until all entries are highlighted and then releasing the left mouse button. As you drag down the list, it will automatically scroll down.
- Click on the Next button.
STEP 10 The “Select the appropriate event(s)...” screen appears showing all docketed events. From this list, you would select the one to which this amending complaint refers. (See Figure 10.)
Figure 10
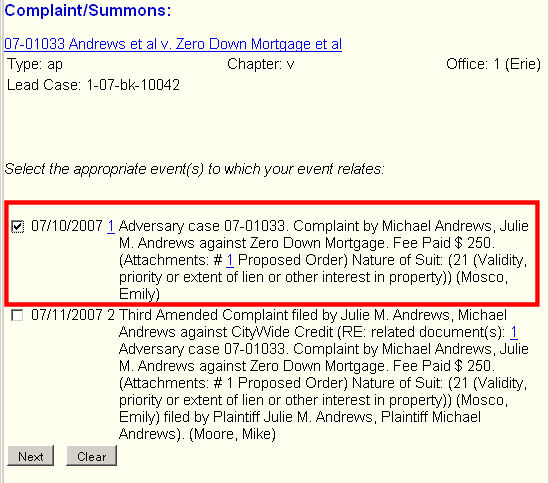
- The system will now display any complaint event that could be amended.
- Since we are amending the original complaint, we check the box next to that event.
- Click on the Next button.
STEP 11 On the “Modify Docket Text” screen; check the docket text to insure all displayed text is correct and complete. (See Figure 11.)
Figure 11
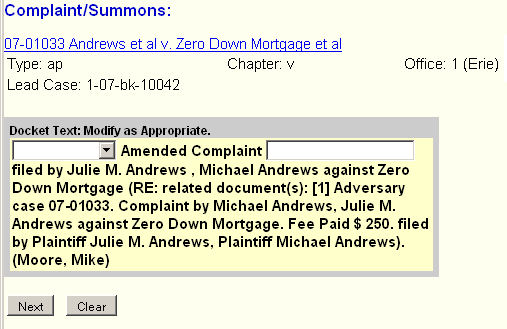
- As always, read the displayed text to insure it is correct and complete. If anything wrong or missing, use your Browser’s Back button to return to appropriate screen to make corrections or add information.
- If appropriate, select a prefix from the drop-down list.
- If needed, add enhancing or clarifying text.
- Click on the Next button to continue.
STEP 12 On the “Final Docket Text” screen; again check the docket text to insure all displayed text is correct and complete. (See Figure 12.)
Figure 12
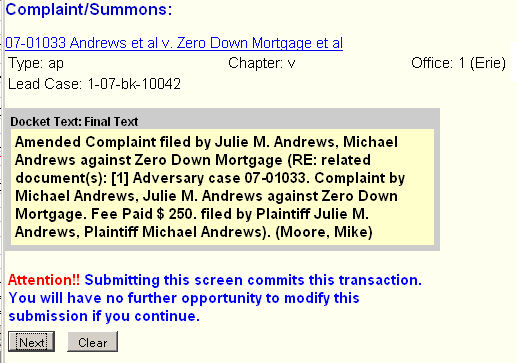
- As with the previous screen, verify the correctness and completeness of the docket text.
- Once satisfied that all is correct, click on the Next button.
Note: As the screen clearly indicates, if you go past this screen, you will not be able to return to any screen to make corrections or additions. You would call the Court and discuss the issue with the Case Administrator monitoring your case.
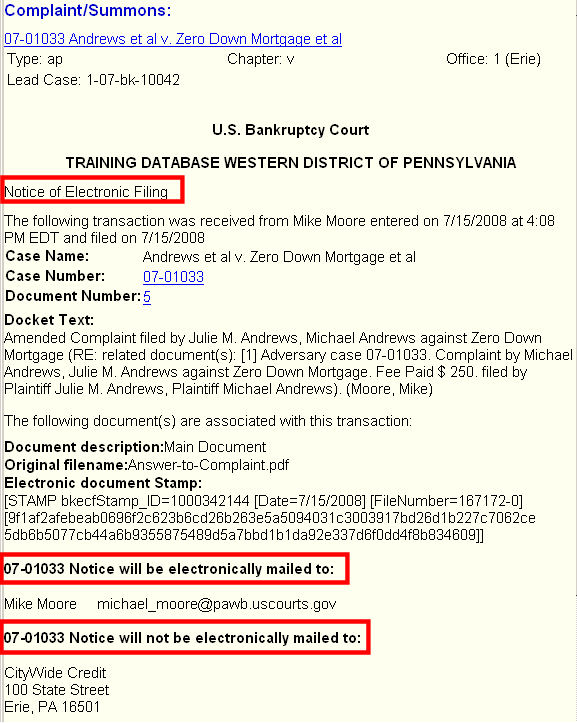
STEP 13 The Notice of Electronic Filing (NEF) this displayed as proof that filing was completed. (See Figure 13.)
Figure 13
- The NEF should be printed and included in your client’s paper file for future reference.
Return to the Topics in Alphabetical Order page.