CM/ECF records professional fee and expense requests filed by trustees, attorneys or other professionals. In this example, we will show how to process an application for Interim Compensation for the debtor's attorney.
The process is similar for any type of compensation with the only significant difference being where the filing attorney may be filing the application as a courtesy to a non-attorney professional (who thus cannot file electronically for themselves) and thus the filing attorney would not establish the attorney/party association with such professional.
STEP 1 Click the Bankruptcy hyperlink on the CM/ECF Main Menu. (See Figure 1.)
Figure 1.
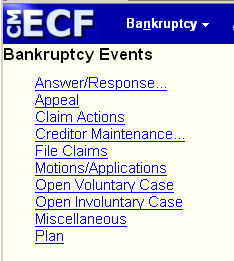
STEP 2 Click the Motions/Applications hyperlink on the BANKRUPTCY EVENTS menu. (See Figure 2.)
Figure 2.
STEP 3 The CASE NUMBER screen displays the last case number used in this CM/ECF session. (See Figure 3.)
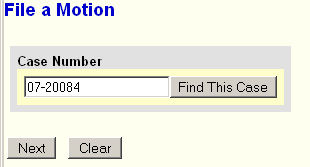
Figure 3.
- If a case number displays and is the correct case, then click on the [Next] button to continue.
- Otherwise, enter the correct case number in YY-NNNNN format.
- Click the [Next] button to continue.
STEP 4 Select the Compensation event from the EVENT SELECTION screen. (See Figure 4.)
Figure 4.

- Type "co" in the event search box to then see the desired event - Compensation.
- Click on Compensation to get it displayed in the Selected Events box.
- Click the [Next] button to continue.
STEP 5 The attorney JOINT FILING screen may then display.
(See Figure 5.)
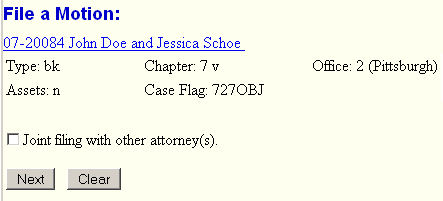
Figure 5.
- This screen is used only if another attorney is joining in a filing, such as a stipulation. If you are the trustee or the only attorney filing this application, skip this screen.
- Click the [Next] button to continue.
STEP 6 The Select the Party screen displays listing all the participants in this case. (See Figure 6.)
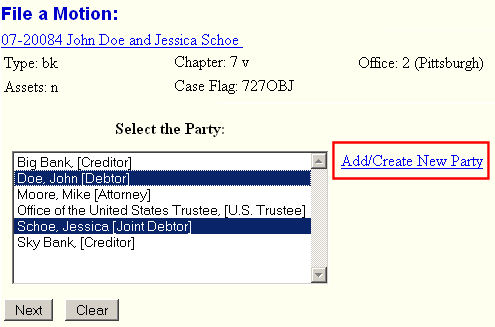
Figure 6.
-
Here you would select the party to receive the compensation. If they are not in the list,
use the Add/Create New Party link to add them. -
In this example, we would add ourself to the list with Role of attorney.
( I did not actually add myself in this example as I would do in a real filing.)
(See Step 10 for more information on whether you will actually be added as a party.)
NOTE: Adding a professional to the party list at this point does not add them as a party to the case. They will appear on the pick list solely for the purpose of recording the request for fees and expenses.
- Click the [Next] button to continue.
STEP 7 The Attorney/Part association screen will then display.
(See Figure 7.)
Figure 7.
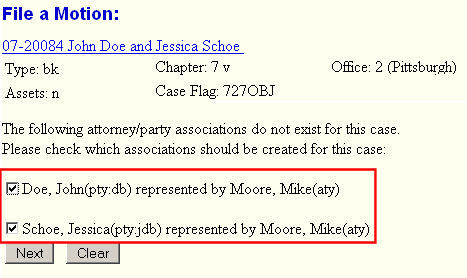
- If you have previously filed for this party in this case, skip to STEP 8.
- If your are filing as the attorney for a professional on the case, then you are probably doing it as a courtesy and not as their attorney, so you would not check the box(es).
- If on the otherhand, you were actually the attorney for the party to receive the compensation, then you would check the box.
- Click the [Next] button to continue.
STEP 8 The Select the pdf Document screen will then display.
(See Figure 8.)
Figure 8.
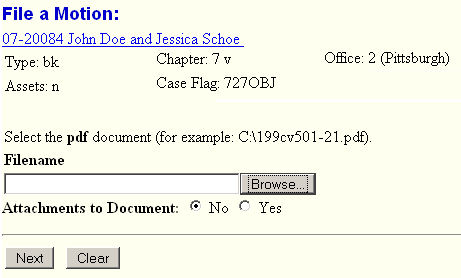
- See the Browse Process for details on identifying the pdf file containing the applications.
- See the Attachment Process for more details on selecting the file(s) containing the proposed order and any exhibit listing details on the time and charges included in the request.
- Click the [Next] button to continue.
STEP 9 The Proceed with No Action screen displays. (See Figure 9.)
Figure 9.
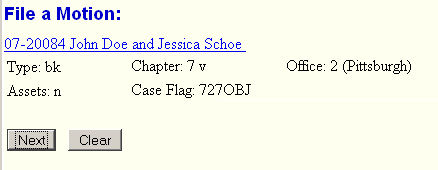
-
This screen requires no action other than once again confirming you are on the correct case.
- Click the [Next] button to continue.
STEP 10 The Fee and Expense Entry screen will then display.
(See Figure 10.)
Figure 10.
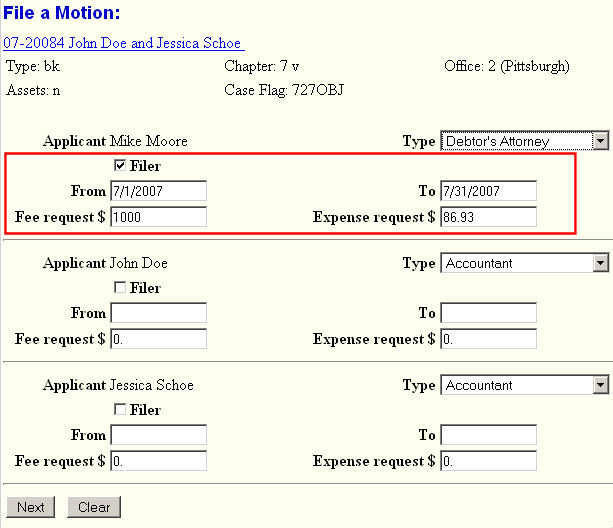
-
Data entered on this screen are recorded in the professional fees and expenses record for inclusion on the Professional Fees Applied For/Awarded report maintained by the Clerk's office..
-
The Filer check box will appear below each party name. Check the Filer box for the filing attorney.
-
If a listed party is not currently a party on the case, a Party check box appears below the professional type list. If this Party box is checked, that party will appear on the Party pick list for this case in future processing. Follow local guidelines on this issue.
-
The Professional Type must be selected to record the applicant’s role in the case. The Professional Type for the applicant will be listed on the Awarded Professional Fees report. Attorney filers should choose Debtor’s Attorney, Creditor’s Attorney, or Trustee’s Attorney.
- In this example we will select Debtor’s attorney.
-
This form is to be completed for the party receiving the compensation. In most cases, it will be the top half of the form - an attorney representing some party. Use the Type selection list to select the correct type or position of the filing attorney.
- The bottom half is completed only for compensation to some third party non-attorney.
NOTE: In all instances, only one Applicant section will be completed.
-
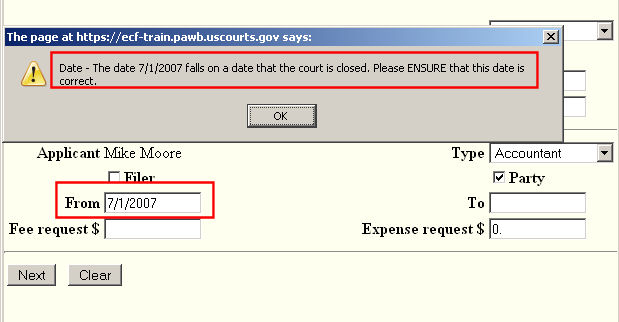
Complete the appropriate From and To dates.
NOTE: If you select a From or To date that is a date the Court is closed, you will get a Date Warning screen. It is just a warning, it will not prevent you from using the date. (See Figure 10a.)
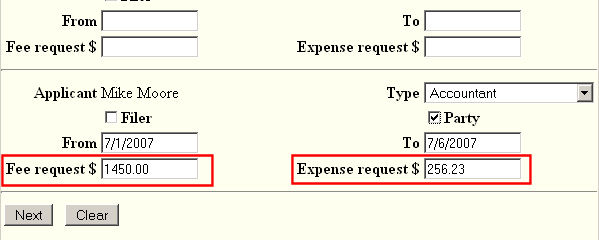
Figure 10aComplete the Fee request and Expense request amounts as appropriate. (See Figure 10b.)
Figure 10bNOTE: The requested values are in actual, not rounded, amounts. No dollar signs or commas.
-
Click the [Next] button to continue. After clicking Next, you might encounter the following messages and/or conditions:
- The system will then display two warnings indicating that you left the Fee and Expense requests fields blank for the lower half of the form. Click OK for both and continue. This will insert 0. in both fields. (Figure 10c)
Figure 10c
- If you are applying for only fees, leave expense field blank; or if only expenses, leave fee field blank and just click on OK in the warning box to continue.
STEP 11 The Modify Docket Text screen will be displayed. (See Figure 11.)
Figure 11.
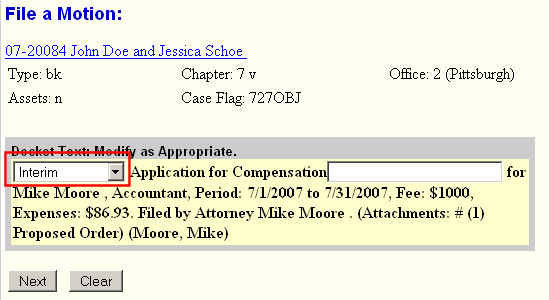
-
Here we use the Prefix field to designate this pleading as Interim. Of course, when
appropriate, you would use a prefix or Final.
- Verify the docket text. If correct, click [Next] button to continue.
- If the docket text is incorrect, Click your browser’s Back button to return to the appropriate previous screen and make the corrections.
-
To abort or restart the transaction (at any time), click the Bankruptcy hyperlink on the CM/ECF Menu Bar.
- Click the [Next] button to continue.
STEP 12 The Final Docket Text screen is presented. (See Figure 12.)
Figure 12.
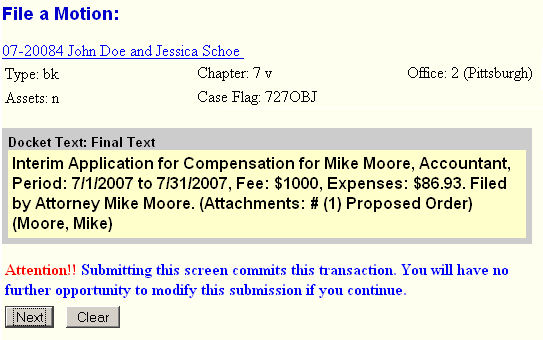
- Go back to previous screen to make any necessary corrections.
NOTE: If errors are discovered after an application or order has been submitted, the Court can correct fee and expense figures.
- Click the [Next] button to continue.
STEP 13 The Notice of Electronic Filing (NEF) is then generated and displayed. (See Figure 13 for a partial NEF.)
Figure 13.
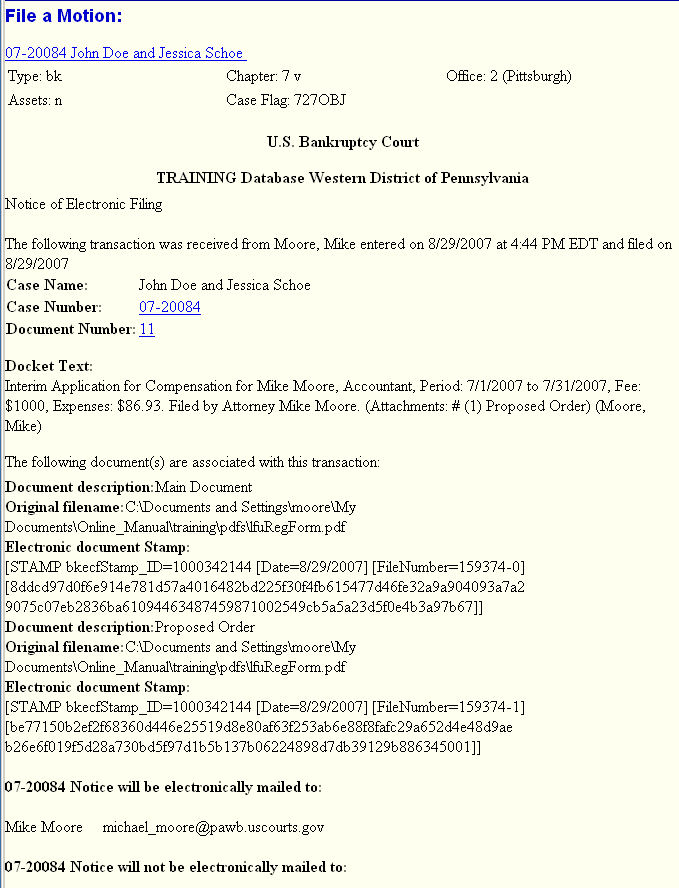
- Clicking on the case number hyperlink on the Notice of Electronic Filing will present the docket report for this case. Attorney users will be presented with a PACER login screen to access these features.
- Clicking on the document number hyperlink will present the PDF image of the application just filed. Attorney users will be presented with a PACER login screen to access these features. One free look at the document is afforded each e-mail participant.
- It is highly recommended that you save a copy of this notification for your records. To print a copy of this notice click the browser [Print] icon.
Return to the Topics in Alphabetical Order page.