This process shows the steps and screens required for attorneys to open a bankruptcy case on CM/ECF. The sample case is a Chapter 7, no asset, joint petition, incomplete/deficient missing schedules A-J, paying in installments with aliases for the debtors.
STEP 1 Click on the Bankruptcy hyperlink on the CM/ECF Main Menu Bar.
(See Figure 1.)
![]()
Figure 1
STEP 2 The Bankruptcy Events screen displays. (See Figure 2.)
Figure 2
For further information on each of these categories, click the HELP icon (the question mark) on the CM/ECF Main Menu Bar.
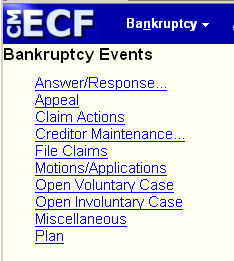
- Click on the Open Voluntary Case hyperlink.
STEP 3 The Open Voluntary Bankruptcy Case screen will display. (See Figure 3.)
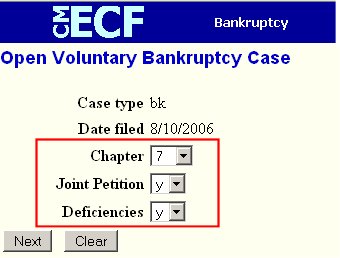 Figure 3 |
This is the standard Open Case characteristics screen for all bankruptcy case openings.
Note that only the Chapter, Joint Petition and Deficiencies can be changed. |
-
The case number will be generated at the end and displayed in the Notice of Electronic Filing.
(See Step 22).
-
The current date is displayed in the Date filed field.
-
Select the Chapter from the pick list box -- or skip it if the default is correct.
-
The default value for Joint Petition is n (no); for a Joint filing select y (yes).
-
If there are any required items missing from the petition, change the Deficiencies box from n to y.
(You will be asked to identify what is missing on a later screen.)
- Once all entries are correct, click on the [Next] button to continue.
STEP 4 The Search for a party screen displays. (See Figure 4.)
Figure 4

-
Use this screen to search the system's master database for the debtor. Before you add the debtor, or any party, you should search the database to see if that party already exists. You can search using one or more of the listed fields. We recommend that you search first by SSN or by Tax Id. Then if no match, narrow your search using Last/Business name - also enter a First Name for common last names.
-
You can enter a last name or just the first few characters of a last name to search the database. If only a few letters are entered, the system will search for any entries in the database that start with those letters. If this is a business filing, enter the first word(s) of the business name to search. The entire business name is stored in the Last/Business name field. The field size is 80 characters.
- In this lesson, we will enter the debtor’s last name and click the [Search] button.
STEP 5 If no match, the system will return a No person found message. (See Figure 5.)
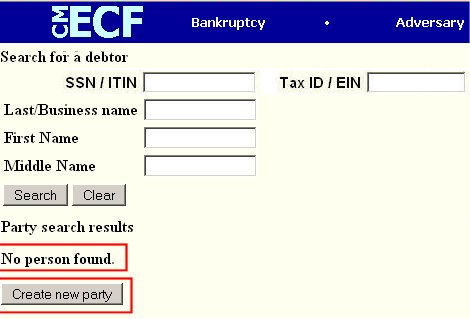
Figure 5
|
|
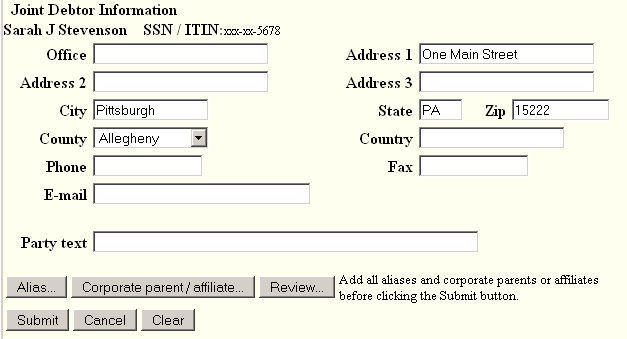
STEP 6 The Debtor Information screen displays. (See Figure 6.)
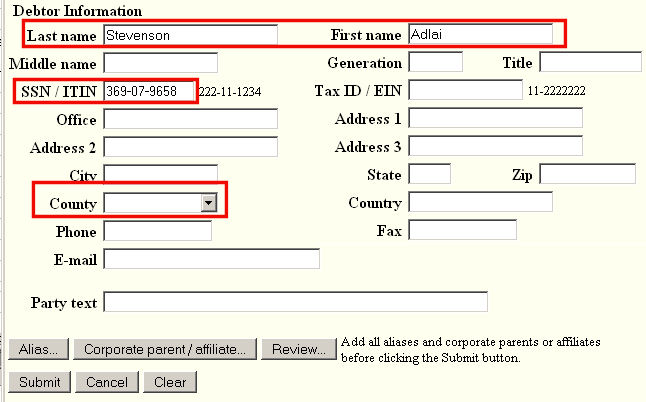
Figure 6
- The screen allows entry of data for a new party.
- Since we searched with the party's last name and first name, that is carried forward to this screen boxes.
- We need either a street address or PO Box, not both.
- Select the debtor’s County of residence from the pick list box - this is a required field.
NOTE: Type only the first letter of the county name to see a list of counties to select from.
- Do not enter Country (unless NOT the US), Phone, Fax or E-mail.
- Enter further descriptive text for the debtor in the Party text field, if appropriate
(such as A Pennsylvania Corporation, Guardian of the State, etc.). Entry is optional.- The filing attorney does not need to add themselves as representing the debtor. As a logged-in
attorney, your name and contact information will be linked to the debtor.
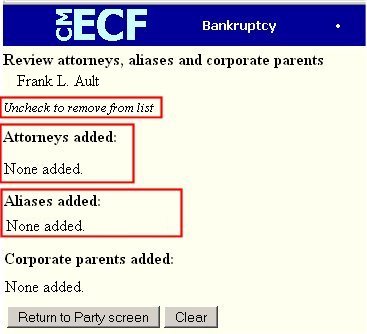
STEP 7 Click on the Review button to see additional data. (See Figure 7.)
Figure 7
- Here we see additional information regarding this party.
Under Attorneys added: it indicates None added ! For bankruptcy case opens, the attorney uploading the petition is automatically designated as the debtor's attorney.
- Click on the Return to Party screen button.
STEP 8 The Party Information screen will return again. (See Figure 6 above.)
- Now that you have entered all the information for this new party, click the [Submit] button.
- If this were a single debtor case, skip to Step 12.
STEP 9 Since this is a joint filing, the Search for a joint debtor screen now appears.
(See Figure 9).
Figure 9

- Here we will search for the second/joint debtor by entering their SSN.
- Click on the Search button to initiate the search.
In this example, the joint debtor is not found. (See Figure 9a.)
Figure 9a
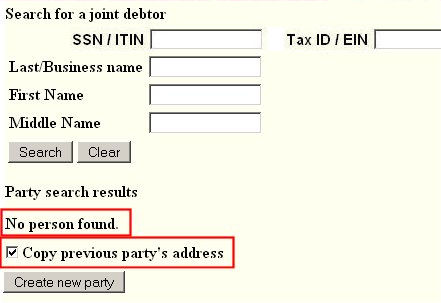
-
Note the “Copy previous party’s address” box - if left checked,
the address from the first debtor will be copied to the joint debtor.
In our example, they do reside at the same address, so we leave the
box checked. (See Figure 9b.)
Figure 9b
- Note the address from the first party has been brought over.
- Click on the [Alias] button if need to add an alias(es).
The Alias Information screen appears. (See Figure 9c.)
Figure 9c
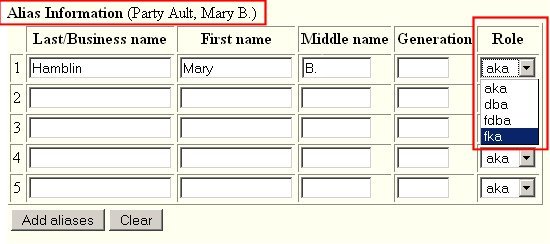
-
You can enter up to five aliases. Role options are aka, dba, fdba, and fka.
- When completed, click the [Add aliases] button.
Once the Joint Debtor Information screen redisplays, click on the Review button.
(See Figure 9d.)
Figure 9dNotice that any alias entered is displayed. If you un-check any alias listed, that alias will be removed from the case.
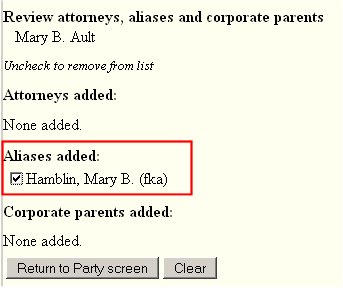
- Be careful about clicking the [Clear] button. You could accidentally delete information.
- When satisfied, click on the [Return to Party screen] button.
STEP 10 You are once again at the Debtor Information screen. (See Figure 9b above.)
- Now that all the data for this party has been entered, click on the Submit button.
STEP 11 The Divisional Office Assignment screen appears. (See Figure 11.)
Figure 11
STEP 12 The Statistical Data screens appear next. (See Figure 12 thru 12b.)
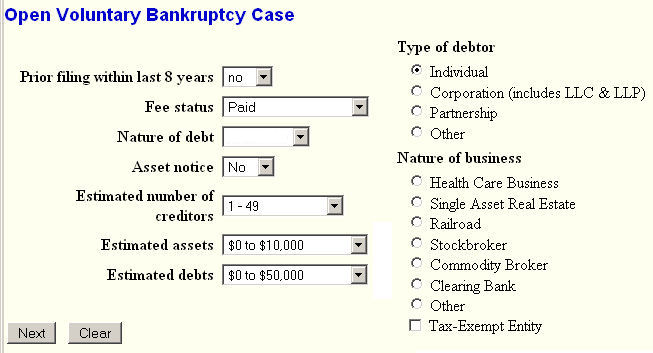
Figure 12
- For the Type of Debtor, click the appropriate box or accept the default.
- If appropriate, select correct Nature of business.
- The Fee Status values are:
Select the correct value.
- Designate the Nature of Debt as "consumer" or "business".
- Asset notice options are "no" or "yes" - Choose "no" for this example.
- Select a range of Estimated Creditors from the pick list box.
- Select a dollar range for Estimated Assets.
- Select a dollar range for Estimated Debts.
- Click the [Next] button to continue.
The Summary of Schedules screen is now displayed. (See Figure 12a.)
(Note: If you are filing an incomplete petition with no Schedules, leave these fields blank. You
would later enter these values when you upload the Schedules.)
Figure 12a

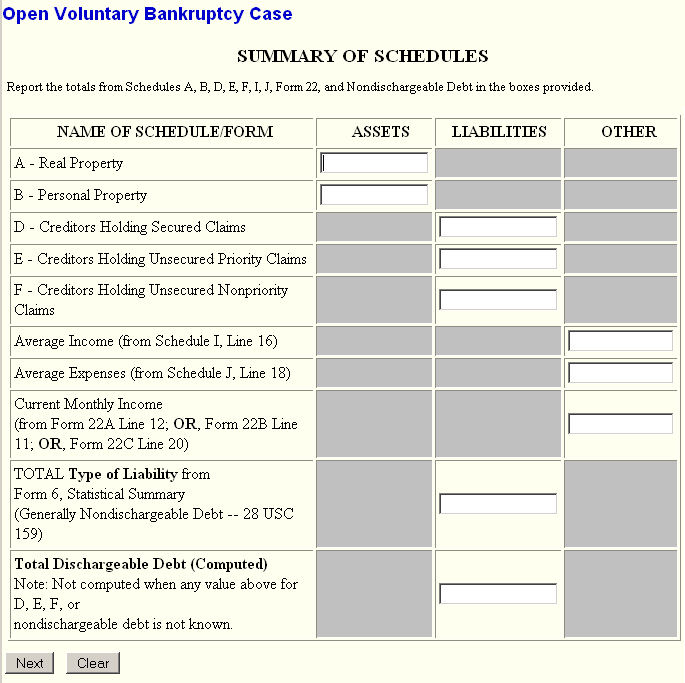
- These values are required for statistical reporting and tracking needs for a petition to be considered as complete.
- If a complete case, then enter all values. If an incomplete case, enter any values you have at this time.
- Do not enter dollar signs or commas.
- Click the [Next] button to continue.
The Remaining Data Required by BAPCPA Act of 2005 screen is displayed and is case specific. Here we see the remaining data required for a Ch. 7. (See Figure 12b.)
Figure 12b
- After entering the appropriate values, click the [Next] button to continue.
STEP 13 Since we selected "y "for Deficiencies at the beginning, the Deficiency List screen appears.
(See Figure 13.)
Figure 13
NOTE: This list will be specific to each chapter.
-
Click in the checkbox for each item that is not included with this petition. For this exercise,
select "Schedules A-J", "Aty Disclosure Stmt." and "Empl Income Record".
-
Note those entries added due to Bankruptcy Act of 2005 (BAPCPA).
- Click on the [Next] button to continue.
STEP 14 The Select the pdf document (also called the Browse screen) screen appears.
(See Figure 14.)
Figure 14NOTE: This screen is used for identifying the pdf file containing the filing.
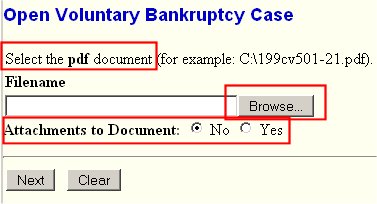
- See the Browse Process for details on how to identify the file containing the petition.
- Click on the [Next] button after selecting the pdf file.
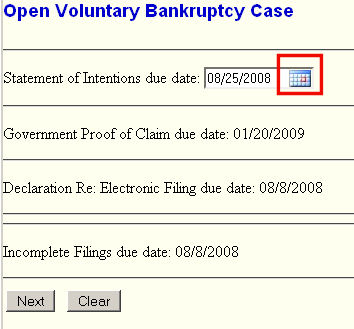
STEP 15 The Case Deadlines screen is presented showing all due dates. If an incomplete
case, then there will be an Incomplete Filings due date:
(See Figure 15.
Figure 15
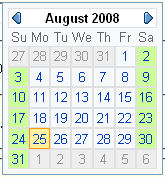
If calendar button clicked, you can see a calendar to select a date. Note that Court closed dates are highlighted in green.
-
Here we see the Statement of Intentions due date - delete the date displayed if the Statement had been included in the pdf with the petition; otherwise, leave the date.
- The Declaration Re: Electronic Filing due date refers to the date for Local Form 1.
- Incomplete Filings due date refers to the date that any missing items are due. This due date will print on the final docket text and will exist as a schedule record for queries and reports. If this were a complete case, this line would not be displayed.
- Click on the [Next] button to continue.
- The Presumption Arises screen is then displayed. (See Figure 15a.)
Figure 15a
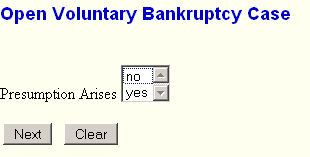
- Click on the correct answer - "no" in this case.
- Click on the [Next] button to continue.
STEP 16 The Receipt # screen appears. (See Figure 16a.)
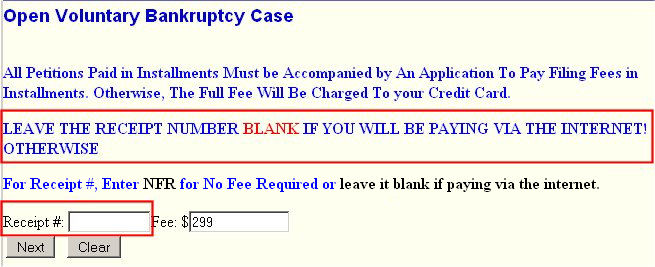 Figure 16a Here we see the Receipt # screen for an installment case where the Fee amount is changeable - here it defaults to the full fee of $299 and allows the filer to enter the amount of the first installment. |
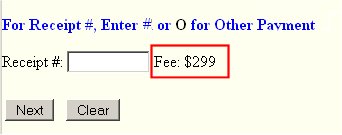 Figure 16c In Figure 16c above we see the Receipt # screen for a full paid case where the Fee amount is fixed and cannot be changed - not in a box allowing changing. |
-
-
Leave the Receipt # field blank.
- Click on the [Next] button to continue.
-
Leave the Receipt # field blank.
STEP 17 The Internet Payment module is now activated by "poping-up" a new browser window.
See the Internet Payment module of the Online Attorney Training Manual for
details on paying online using Pay.gov.NOTE: Be sure that your browser is NOT configured to block popups!
STEP 18 The next screen asks if any judgement(s) have been issued against the debtor as a
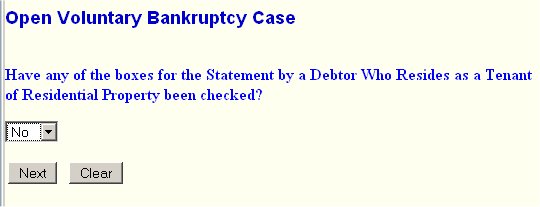
tenant of a residential property. (See Figure 18.)
Figure 18
- Answer "Yes" or "No"
- Click on the Next button to continue.
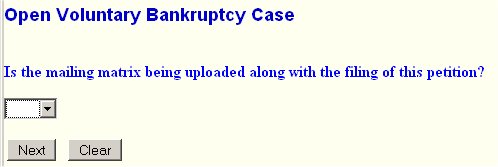
STEP 19 You are next asked if the Mailing Matrix will be uploaded with the petition.
(see Figure 19.)
Figure 19
- If you answer "yes", then click on Next and go to Step 21.
- If you answer "no", you will see a warning screen. (See Figure 19a)
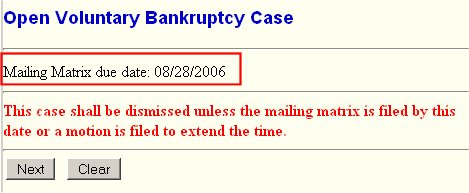
Figure 19a
- As the message clearly states, if you do not upload the matrix at this time, you
must do so by the indicated date (7 days from filing date) or file to extend time by the indicated date or this case will be dismissed!
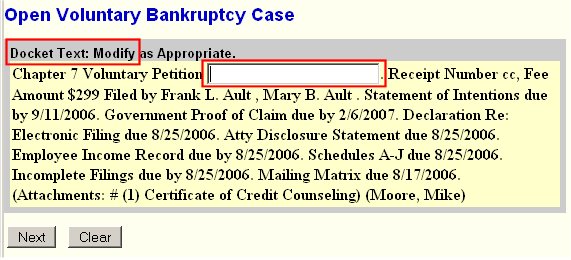
STEP 20 The Modify Docket Text screen appears. (See Figure 20.)
Figure 20
You as the electronic filer are creating the docket text - not the Court. What is seen now is text compiled from entries and other actions made on previous screens.
It is crucial that you review this text looking for errors or omissions. If found now, you still have the opportunity to use your Browser's Back button to return to an appropriate screen and make corrections.
If you do go to a previous screen and make a correction, you must resubmit that screen (usually accomplished by clicking on the Next button at the bottom of the screen) and then redo and resubmit all subsequent screens!
- Check the text and go back and make any corrections.
- Click on the [Next] button to continue.
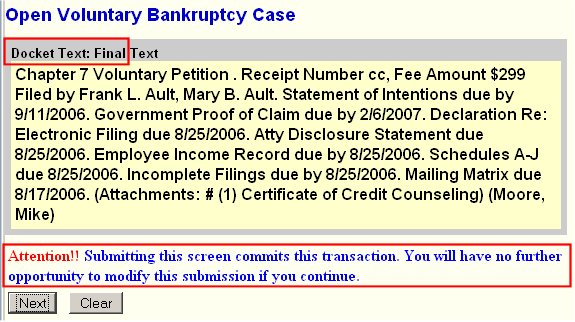
STEP 21 The Final Docket Text screen displays. (See Figure 21.)
Figure 21
- Once again, review the text. There is still time to go back and make corrections.
- Once all is correct, click on the Next button.
NOTE: Notice the message at the bottom of this screen indicating that once the Next button is clicked, the pdf file(s) will be uploaded and it is then too late to make any changes to the pleading.
To abort or restart the transaction, click on the Bankruptcy hyperlink on the CM/ECF Main Menu Bar.
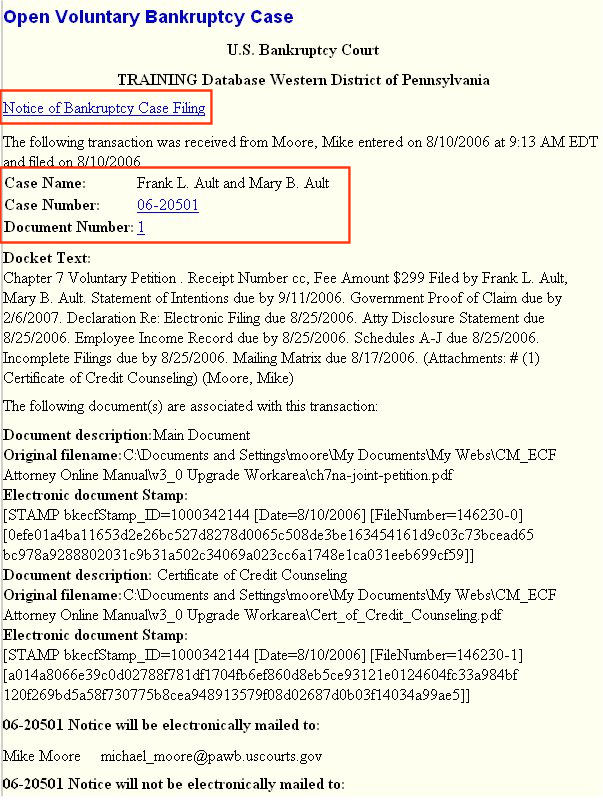
STEP 22 The Notice of Electronic Filing (or Receipt) screen displays. (See Figure 22.)
Figure 22
- This Notice of Electronic Filing (NEF) is the verification that the filing has been sent electronically to the Court’s database. It certifies the that petition is now an official court document.
- Make a note of the Case Number, which appears as a hyperlink. Triggering this hyperlink, 04-20074 in this example, will display the docket report for this case.
- Clicking on the Document Number hyperlink will display the PDF file just uploaded/filed.
- The Notice of Bankruptcy Case Filing hyperlink appears at the top of the NEF. Triggering this hyperlink reveals a notice summarizing the pertinent details and participants of this case. (See Figure 23.)
NOTE: You must enter your PACER login and password to view any documents or reports or perform any queries.
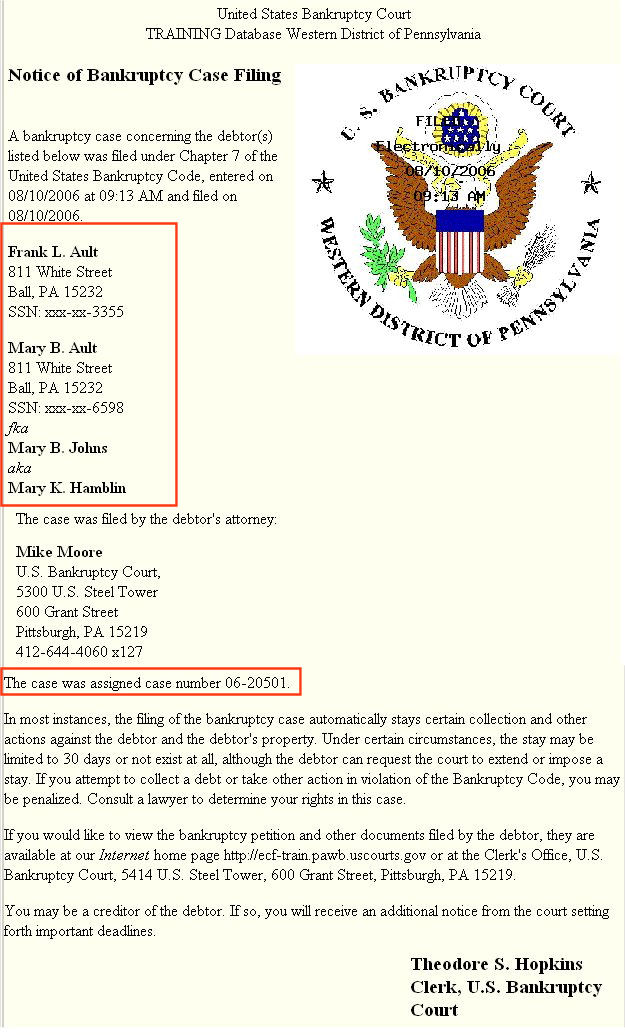
The Notice of Bankruptcy Case Filing will be displayed. (See Figure 23.)
Figure 23
- This certification was created in addition to the initial notice of filing. It also displays the debtor(s), attorney, trustee, case number, time, and filed date of the case opening information. It can be used to notice creditors as an official notice of stay besides the 341 Meeting Notice to stop foreclosures and other creditor actions.
- The Notice of Bankruptcy Case Filing is also available for viewing or printing through the Query option on the Main Menu.
- To print a copy of this notice, click the browser's [Print] button or icon.
- To save a copy of this receipt, click [File] on the browser menu bar and select Save Frame As or Save File As - depending upon how your pdf program is configured.
NOTE: If this case had been opened by the Court, the time stamp would not appear on the seal. It appears only for cases opened electronically by non-court users.
Return to the Topics in Alphabetical Order page.