CM/ECF requires all files (with the exception of the mailing matrix) to be in PDF (portable document format) format. All documents filed through the CM/ECF system shall comply with W.PA.LBR 5005-13.
All files created, or modified in any way, by the filing attorney must be converted/exported into PDF format - most specifically, "searchable" or "text searchable" PDF format. Thus any PDF conversion program that generates searchable PDF's will suffice. See more detail on searchable vs non-searchable PDFs later in this module.
The PDF format is a specific format that allows creating documents using any program, such as a word processor or bankruptcy software, and then creating a copy of that original document in PDF format. This conversion is done using the Print function - conversion programs install themselves within the Windows Operating System and mimic a printer.
When you install your PDF conversion program, it will add an entry to the list of printers available to the print function of any program. Thus creating a searchable PDF is accomplished by "printing" to the PDF conversion program instead of an actual printer. This process is detailed below.
Below find the process for using Microsoft Word and WordPerfect generate PDF files. In both examples, it is assumed that a PDF conversion program is installed on the computer being used.
Searchable vs Non-Searchable PDF Files
A seachable PDF file is, as the name indicates, searchable by using the "Search" of "Find" features of a PDF viewing or conversion program. This allows for easy navigating of even lenghty documents. An additional advantage of this format is that it is creates smaller files which then more quickly upload and download.
A searchable PDF file is not normally created through scanning! Scanning a document creates essentially a "picture" of the document and thus text is not recognized as such and cannot be searched for. Documents already created and requiring filing, would be scanned and are not required to be searchable.
For documents including or requiring signatures, see W.PA.LBR 5005-6.
Flat PDF Files
A concern regarding searchable PDF files is the concept of a "flat" PDF file. With recent versions of Adobe Acrobat and other PDF conversion programs came certain advanced features. These features include, but are not limited to, fillable fields and meta data. The CM/ECF system prohibits these and instead requires a "flat" file - one containing the text only without these advanced features.
Meta data allows the tracking of such information as who last opened a PDF file, when it was opened, when it was changed, who changed it, etc. Meta data is an option within the PDF conversion program. One must disable or remove this feature either as a permanent factor for all PDF files created or on a file-by-file basis.
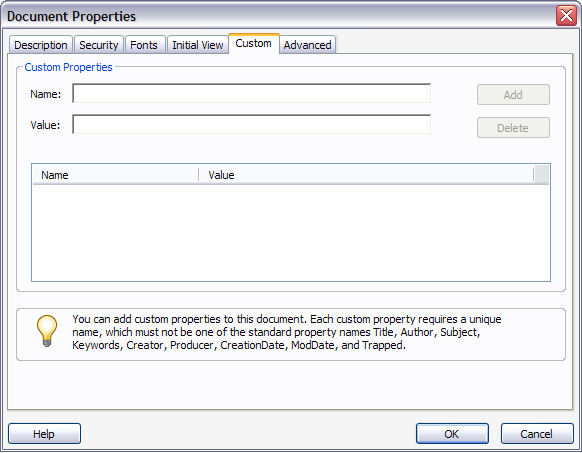
In Adobe Acrobat Standard v8, to remove meta data from a file, use the "Custom" option of the "Properties" feature from the File menu.
Acrobat v8
Insure that no entries appear the list box at the middle of this screen. If so, highlight each and
then click on the "Delete" button. Do this until all entries are gone. Then click on "OK."
For Acrobat v6 and v7:
- Open PDF file in Adobe Acrobat (Adobe Reader cannot be used to edit PDF files).
- Display Document Properties using File | Document Properties | 'Description' tab.
- Delete any undesirable text present in the 'Author', 'Subject,' or 'Keywords' fields.
- Move to the "Custom" tab and do the same.
- File|Save As to the same name to overwrite the previous version with the meta data with this newer version without the meta data.
Documents with Fillable Fields
To flatten any PDF file containing fillable, or fill-in, fields, print the document to your PDF conversion program following the general: File | Print and then selecting the entry for your PDF conversion program from the available printers list (See Figures #1 and #2 below using Word but is almost identical to how it is done in any PDF conversion program.) This creates a new PDF file that is flattened and can be uploaded in CM/ECF.
Microsoft Word
The discussions below are for an older version of Word. Newer versions may differ slightly,
but the overall flow and techniques are essentially the same.
Step 1 Enter the pleading into a blank document or complete a template.
Step 2 Save the document as a Word document.
Step 3 Activate the Print option from the Menu Bar. (See Figure 1.)
Figure 1.

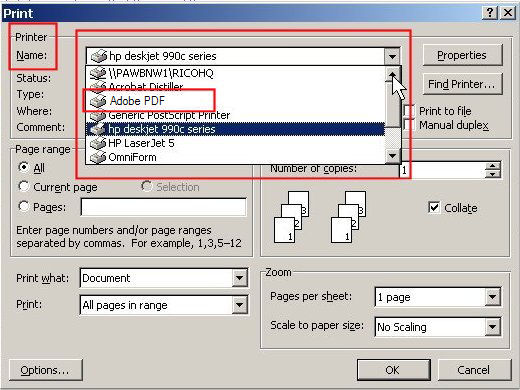
Step 4 The Printer dialog box appears. (See Figure 2.)
Figure 2.
-
From the Printer name drop-down list, select the entry added by your PDF program
when it was installed. You may have to scroll up or down to find that entry.
Note: Here we see the list of printers on my computer. Note the entry for Adobe PDF. That is the entry my conversion program added to the list when it was installed.
If you are using an older version of Adobe Acrobat, the text might be slightly different but still quite evident that it is Adobe or Acrobat. Other PDF conversion programs will have their own text clearly indicating their conversion progrm.
- Click on the OK button to continue.
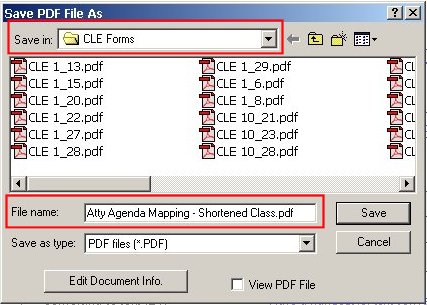
Step 5 The Save PDF file as dialog box appears. (See Figure 3.)
Figure 3.
-
Accept or enter a File name.
-
Navigate to the correct drive and folder using the Save in list.
- Click on the Save button
You have now created a searchable PDF file on your computer containing the pleading you wish to file.
You would then log into CM/ECF and upload this file.
WordPerfect
The discussions below are for an older version of WordPerfect. Newer versions may differ slightly, but the overall flow and techniques are essentially the same.
Step 1 Enter the pleading into a blank document or complete a template.
Step 2 Save the document as a WordPerfect document.
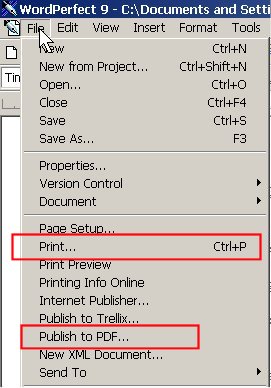
Step 3 Activate the Print option from the Menu Bar. (See Figure 4.)
Figure 4.NOTE: Even though your menu may offer a Publish to PDF... option, do not select this option. This feature is a scaled-down, limited conversion program that will only work on the simplest of documents. To ensure that your document is completely, and correctly converted, do not select this option and instead
use your installed PDF conversion program.
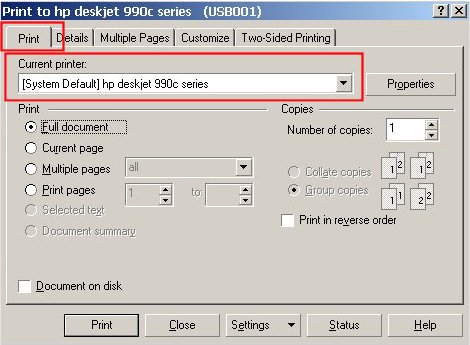
Step 4 The Printer dialog box appears. (See Figure 5.)
Figure 5.
-
First insure that you are viewing the Print tab.
-
From the Destination Name or Current printer: (depending upon your version of WordPerfect) drop-down list, select the entry for your PDF program. This field lists all printers installed on your computer. Since the PDF conversion program mimics a printer, your PDF conversion program will have added an entry to this list.
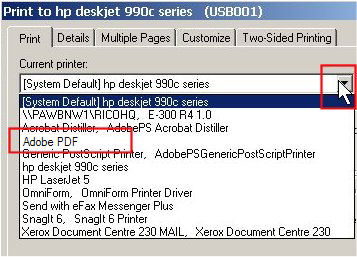
(See a zoomed-in view of the Current printer list in Figure 5a.)
Figure 5a.
Note: Here we see the list of printers on my computer. Note the entry for Adobe PDF. That is the entry my conversion program added to the list when it was installed.
If you are using an older version of Adobe Acrobat, the text might be slightly different but still quite evident that it is Adobe or Acrobat. Other PDF conversion programs will have their own text clearly indicating their conversion progrm.
-
From the Current printer list, select the entry added by your PDF program
when it was installed . You may have to scroll up or down to find that entry.
- Click on the Print button to continue
Step 5 The Save PDF file as dialog box appears. (See Figure 6.)
Figure 6.
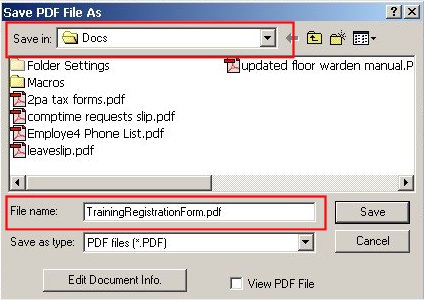
- Accept or enter a File name.
- Navigate to the correct drive and/or folder where this file is to be stored using the Save in list.
-
Click on the Save button to create the PDF file with the indicated name and stored in the
indicated drive and folder on your computer or the network your computer is connected to.
You have now created a searchable PDF file on your computer containing the pleading you wish to file.
You would then log into CM/ECF and upload this file.
Bankruptcy Software
Step 1 Enter the pleading using the process provided by the software.
Step 2 Export or create the PDF format using the process provided by the software.
Return to the Topics in Alphabetical Order page.