When a proof of claim is filed in CM/ECF, the claim will be attached to the creditor record of the claimant. One must first locate the creditor by searching the creditor database and then enter the corresponding claim.
Note: Even though filing electronically, it is still necessary to send a paper copy of the claim to the debtor's attorney.
Most often the creditor filing the claim already resides in the creditor data base. If the creditor is not on the case, you must add the creditor (see link to the Add Creditor Process in Step 4 below).
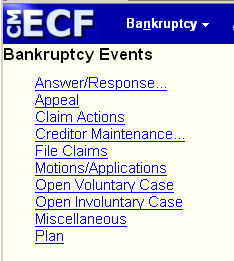
STEP 1 Click on the Bankruptcy hyperlink on the CM/ECF Main Menu. (See Figure 1.)
![]()
Figure 1
STEP 2 The Bankruptcy Events screen displays. (See Figure 2A for attorney filers.)
(See Figure 2B for Limited Filing Users.)
|
|
|
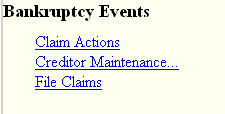
- Click on the File Claims hyperlink.
STEP 3 The Search for Creditor screen will display. (See Figure 3.)
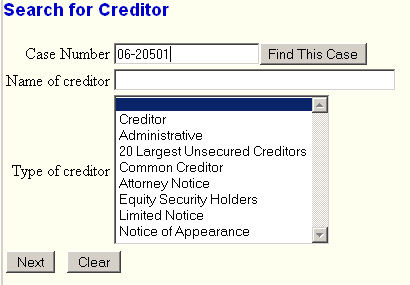
Figure 3.
-
Enter the Case Number in YY-NNNNN format.
- Enter the Name of creditor filing the claim.
NOTE: When entering the name, enter it correctly to match the name stored in the system. Due to the possibility of spelling differences, one should best leave this field blank
NOTE: Do not change the default of Creditor in the Type of Creditor box. When a matrix is uploaded to the system, the Creditor Type field defaults to Creditor. The Creditor Type must match the creditor information. If creditors are stored on the database as a different Creditor Type, you will have to search by that Type. A creditor with a Creditor Type of Notice of Appearance will not be found unless the Creditor Type field is changed to Notice of Appearance.
- Click on the [Next] button to continue.
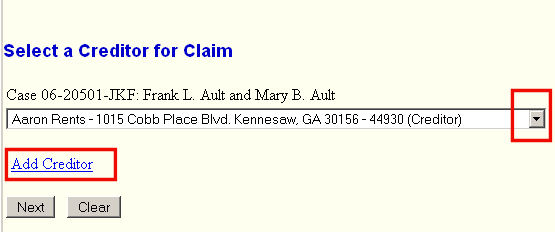
STEP 4 The Select a Creditor for Claim screen will then display any creditor(s) that match the search criteria. (See Figure 4.)
Figure 4.
NOTE: If no name was entered in the Name of Creditor field in the previous screen, all creditors belonging to the case will be found in the selection list.
-
If the creditor is already on the case and you select them in the drop-down list, the system will display (actually pop-up) a window showing any claims already filed on behalf of that creditor. (See Figure 4b.)
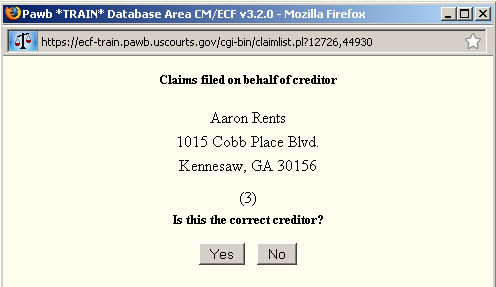
Figure 4b.- Answering "Yes" closes the window and moves on to the Claims Information screen and you would skip to STEP 6.
- Answering "No" closes the window and returns to the beginning of Step 4.
-
If the creditor is not already on the case or you want to use a different address for a creditor already on the case, click on the Add Creditor hyperlink to add the creditor. Once you have completed adding the creditor, select the "File A Proof Of Claim" link on the Creditors Receipt screen to get back to Step 3 above.
See the Add Creditor for Claims Process for details on adding a creditor to the database.
-
Click on the Next button to continue.
STEP 5 On the Select a Creditor for Claim screen, select the creditor that is now on the case.
(See Figure 5.)
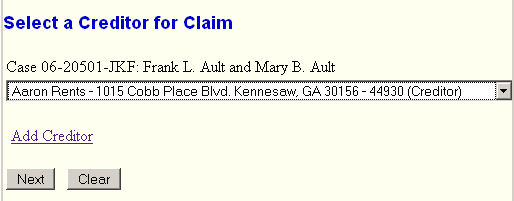
Figure 4b.
-
Trigger the drop-down list to find the just added creditor.
- Click on the [Next] button to continue.
STEP 6 The Claim Form screen displays. (See Figure 6.)
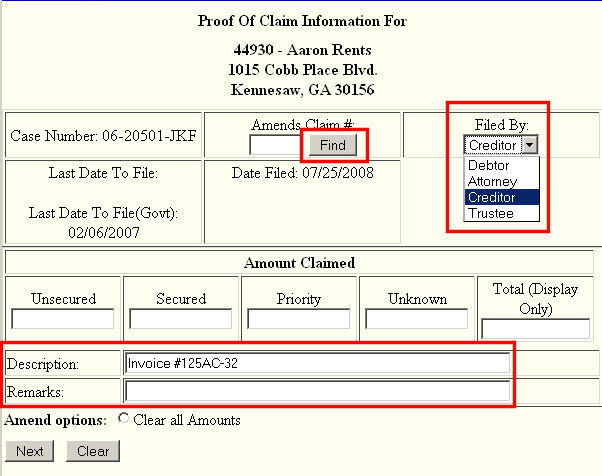
Figure 6
-
Leave the Total fields blank. (Notice they say "Display Only").
- These fields are automatically calculated by the system.
-
If the claim amends a previously filed claim, enter the prior claim # in the Amends Claim # box.
Note: See the Find button. If that button clicked on, one can see:
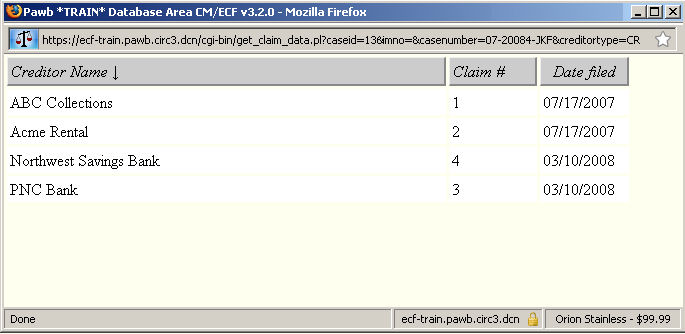
Figure 6b
Here you see the existing claims and can identify the one that you wish to change. -
If the claim is a duplicate, indicate prior claim # in Duplicates Claim # box.
-
The Filed By field offers the options of attorney, creditor, debtor, or trustee.
-
The Late field offers the options of “no” or “yes”.
-
The Status field should remain blank.
- Enter the amount(s) claimed in the appropriate Unsecured, Secured, Priority or Unknown field(s).
Note: Do not enter the "$" or commas. Values default to whole dollars - decimals accepted but not required.
- The Description and Remarks fields will appear on the Claims Register. Both fields are 60 characters long.
Note: Do not enter entire account numbers or other data not adhering to privacy guidelines.
- Click on the [Next] button to continue.
STEP 7 The Select the pdf document screen displays. (See Figure 7.)
Figure 7.
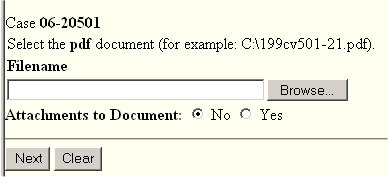
-
See the Browse Processfor details on identifying the pdf file containing the POC.
- See the Attachment Process for details, if needed, on attaching additional pdf files in support of the POC.
NOTE: The PDF file containing this claim is not an attachment. An attachment is other supporting document or collateral information in a separate PDF file from the one containing the claim.
- After identifying pdf files, click on the [Next] button to continue.
NOTE: Filing a Claim is not a docketing action. Thus no Modify/Final Docket Text screens will display. Therefore, insure that the values entered in the claim form screen are correct. If unsure, use your Browser's Back button to review that screen and make any necessary changes.
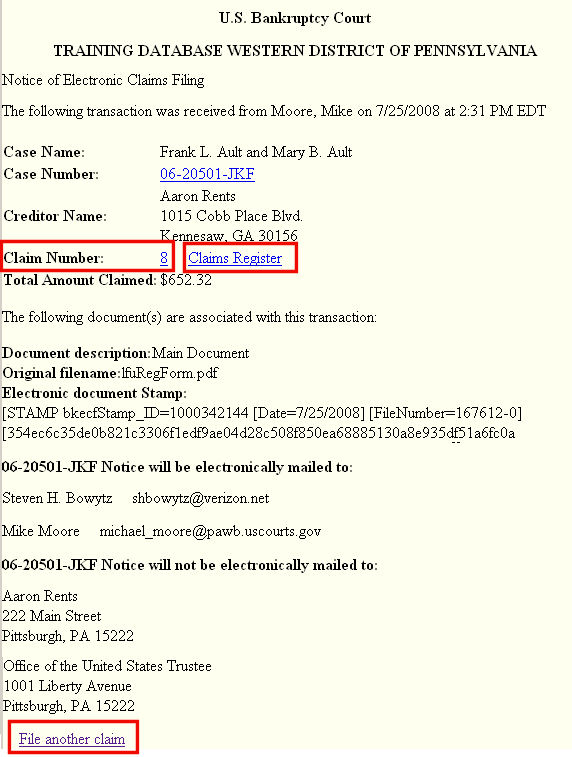
STEP 8 The Notice of Electronic Claims Filing is then produced and displayed. (See Figure 8.)
Figure 8.
-
This claim is now part of the official court record.
- Note the displayed Claim Number for future reference and hyperlink to go directly to view the Claims Register.
- At the botton is a link to restart the process at STEP 3 to file another claim.
Return to the Topics in Alphabetical Order page.