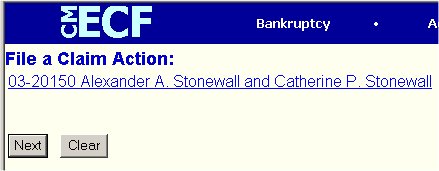
STEP 1 After selecting the Objection to Transfer of Claim event, the Case Verification screen is displayed. (See Figure 1.)
Figure 1
- Verify that you are in the correct case by checking the case number and case name.
- If wrong case, use the Browser's BACK button to return to the Case Number prompt screen and enter the correct case number.
- Click on the [Next] button to continue.
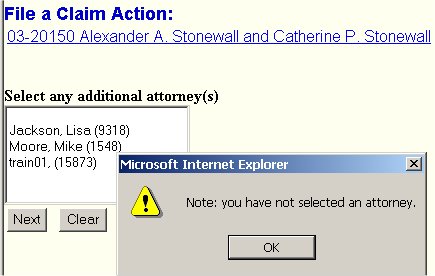
STEP 2 The Select any additional attorney(s) screen displays. (See Figure 2.)
Figure 2.
- Do not select any additional attorneys.
- Click on the [Next] button to continue.
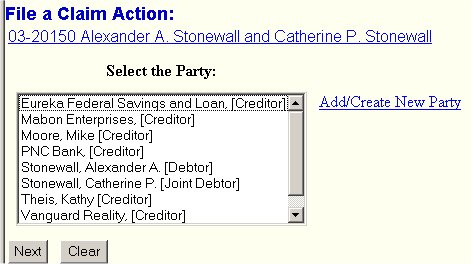
STEP 3 The Select the Party screen will display. (See Figure 3.)
Figure 3.
- Here is where you add yourself as a party to this case. Once added, you would select yourself in the Party List.
- Click on the Add/Create New Party hyperlink to add yourself as a party to the case.
See the Create New Party Process routine for details.
Note: Your search in the Create New Party Process should find yourself listed in the system database. You are added to this database when you get your Limited Filing User login. If you fail to find yourself, something is wrong and you would need to contact the Court for resolution.
Note: When on the Party Information screen in the Create process, select "Creditor" in the Role field.
- Once your name appears in the Party List, click on the [Next] button to continue.
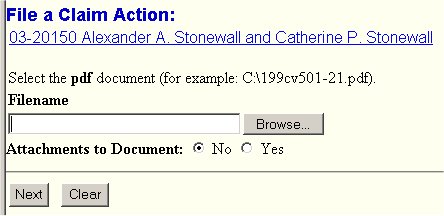
STEP 4 The Select the pdf document screen will then display. (See Figure 4.)
Figure 4.
- See the Browse Process to identify the pdf containing your Request for Notice pleading.
- Click on the OK button to continue.
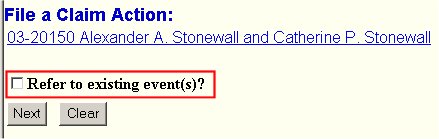
STEP 5 The Refer to existing event(s)? screen is displayed. (See Figure 5.)
Figure 5.
- Leave box unchecked since this pleading does not reference an existing docket entry.
- Click on the OK button to continue.
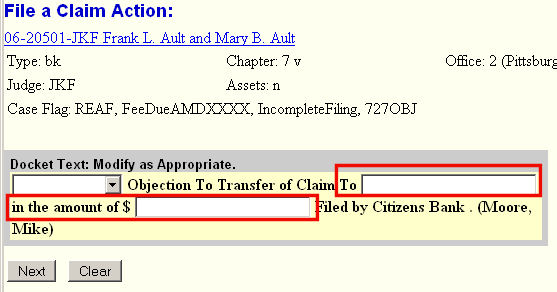
STEP 6 The Modify Docket Text screen is displayed. (See Figure 6.)
Figure 6.
- Enhance the docket with the name of the creditor to whom the claim would be transferred and the amount of that claim.
- Click on the Next button to continue.
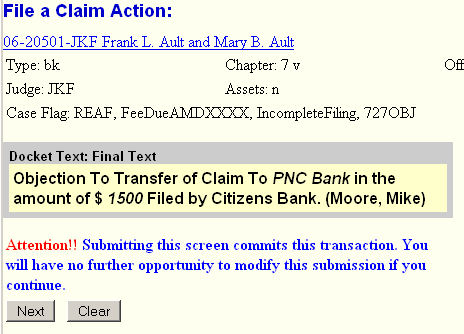
STEP 7 The Final Docket Text screen is displayed. (See Figure 7.)
Figure 7.
- Verify that the docket text is correct. If errors, use your Browser's BACK button to return to appropriate screen and correct.
Note: If you do make a correction, you must resubmit that screen and any subsequent screens. Do not use the Forward button.
- Click on the Next button to upload the pdf and file this pleading.
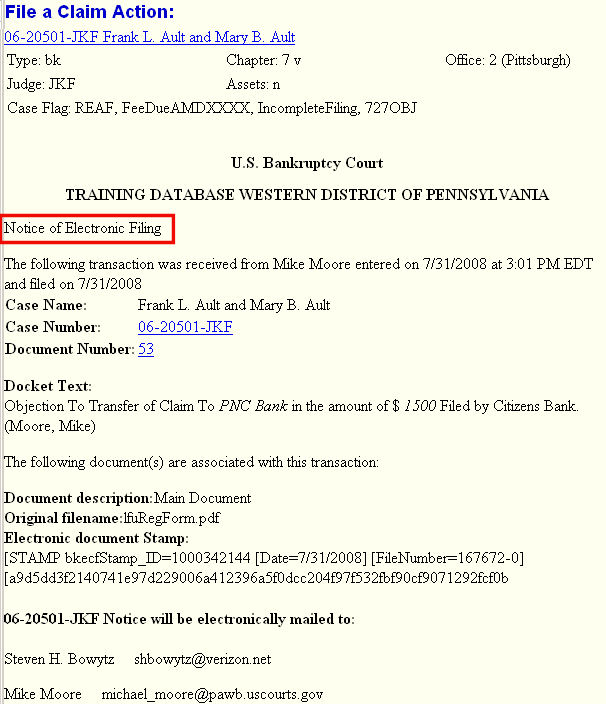
STEP 8 The Notice of Electronic Filing is displayed. (See Figure 8.)
Figure 8.
- The screen verifies that the Objection to Transfer has been uploaded and filed.
- To print a copy of this notice, click the browser [Print] button or icon.
- To save a copy of this receipt, click [File] on the browser menu bar and select Save Frame As.
Return to the Topics in Alphabetical Order page.