This process shows the steps and screens required for attorneys to docket the execution or unexecution of the service of a summons in an adversary case.
STEP 1 Click on the Adversary hyperlink on the CM/ECF Main Menu Bar. (See Figure 1.)
![]()
Figure 1
STEP 2 The Adversary Events menu displays. (See Figure 2.)
Figure 2
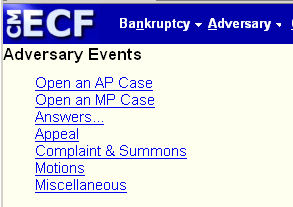
- Click on the Complaint & Summons hyperlink.
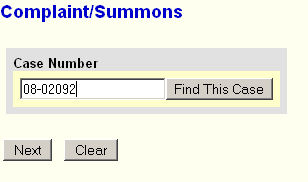
STEP 3 The Case Number prompt screen displays. (See Figure 3.)
Figure 3
-
The system will display the number of the last case you accessed in this session. If this is a different case, make sure you change the case number!
- Click on the [Next] button to continue.
STEP 4 The The Event List screen displays. (See Figure 4.)

Figure 4
-
Notice that there is an event for the Summons Service Executed and one for Summons Service Unexecuted.
- If the defendant was successfully served the summons, then the service was accomplished, or executed, so select the Summons Service Executed event. If the defendant could not be found to be served, and the service was not accomplished, then you would select the Summons Service Unexecuted event.
-
Note the Lead Case is listed in the status section towards the top of the screen.
- Click on the appropriate event, then Click on the [Next] button to continue.
STEP 5 The Select the pdf Document screen displays. (See Figure 5.)
Figure 5
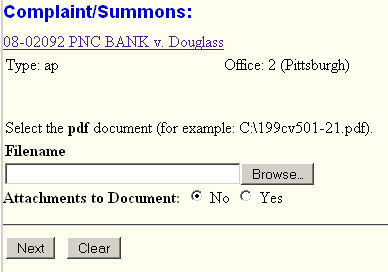
- See the Browse Process for details on identifying the pdf file containing the Complaint.
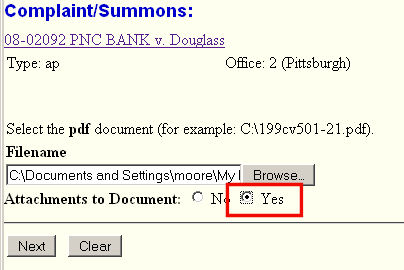
Next we identify the Attachment - the additional pdf file containing the Proposed Order. (See Figure 5a.)
Figure 5a
-
Change the Attachments to Documents radio button to Yes.
- Click on the [Next] button to continue.
NOTE: It is crucial that you click the Next button, and NOT the Browse button!
- See the Attachment Process for details on identifying the Proposed Order.
STEP 6 The Select the party served screen displays. (See Figure 6.)
Figure 6
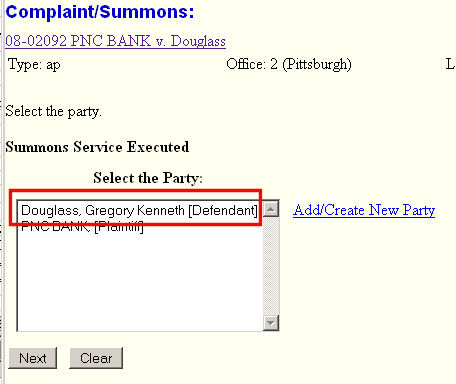
-
Select the party(ies) upon whom the summons(es) were served, or attempted to be served. This will normally be the defendant(s). Click on the appropriate party(ies).
- To select multiple parties, select the first party, then hold down the Ctrl-key and click on the other party served or attempted. Scroll down, if necessary, to be able to see and select all of the appropriate parties. Once all selected, release the Ctrl-key.
NOTE: Although the screen says to select the party served, select the appropriate defendant(s) whether the service of the summons was executed or unexecuted.
- Click on the [Next] button to continue.
STEP 7 The Enter date served screen will then be presented. (See Figure 7.)
Figure 7

-
The screen displays a date served for each party served, or attempted to be served.
- The date served defaults to the Filed Date. If necessary, enter the actual date the summons was served.
NOTE: The availability of the Calendar button.
- When the date(s) served has been entered for each party served, click on the [Next] button to continue.
STEP 8 The Modify Docket Text screen displays offering an opportunity to customize the entry. (See Figure 8.)
Figure 8
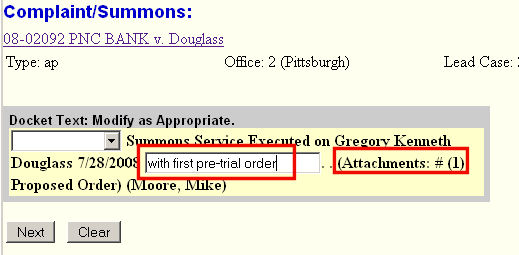
-
If appropriate, you can select a prefix for the docket text such as Second. You can also insert additional descriptive text in the window after the service date. Verify the accuracy of the docket text, because this is what will print on the docket report.
-
Enter text in the Enhance Text box to reflect that you served both the summons and the first pretrial order.
-
Make sure the Attachments: entry is there indicating an additional pdf file was identified.
- Click on the [Next] button to continue.
NOTE: The docket text for the Summons Returned Unexecuted event says that the summons was “Returned Unexecuted” rather than “Service Executed.”
STEP 9 The Final Docket Text screen displays. (See Figure 9.)
Figure 9
- This screen is your last chance to correct the event before it is submitted to the court’s database. Verify the accuracy of the docket text.
-
Notice that any text added in Enhance Text box appears in italics in the docket text.
-
If the docket text has any errors, click the browser [Back] button and correct the error.
-
To abort or restart the transaction, click on the Adversary hyperlink on the CM/ECF Main Menu Bar. Although this can be done at any time, this is your last opportunity to change the event.
- Once the docket text is correct, Click on the [Next] button to continue.
STEP 10 The Notice of Electronic Filing screen will then be generated. (See Figure 10.)
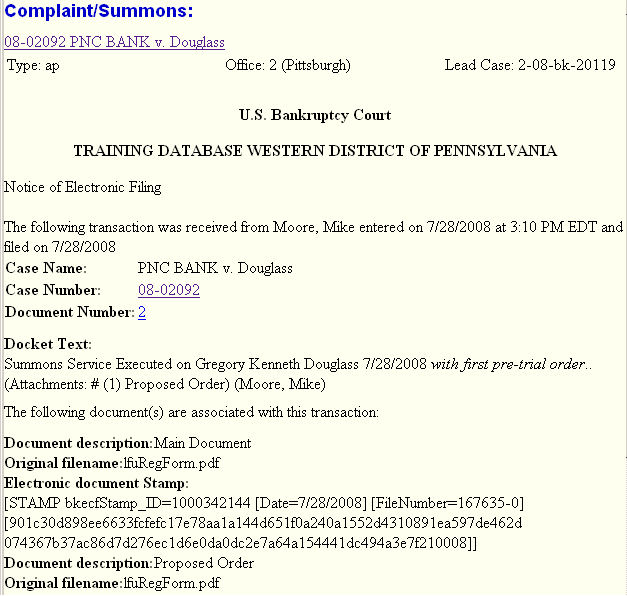
Figure 10
-
The Notice of Electronic Filing is the verification that the filing has officially been entered into the court’s database.
-
Clicking on the case number hyperlink on the Notice of Electronic Filing will display the docket report for this case. However, viewing the document will require entry of your PACER login and password.
-
Clicking on the document number hyperlink will display the PDF image of the document just filed. However, viewing the document will require entry of your PACER login and password.
- To print a copy of this notice, click the browser [Print] icon or button.
Return to the Topics in Alphabetical Order page.