(Using Relief from Stay and Adequate Protection As An Example)
This procedure explains how to docket a two-part motion with an attached Proposed Order.
STEP 1 Click the Bankruptcy hypertext link on the CM/ECF Main Menu. (See Figure 1.)
![]()
Figure 1
STEP 2 The BANKRUPTCY EVENTS screen will display. (See Figure 2.)
Figure 2
- Click the Motions/Applications hyperlink.
STEP 3 The CASE NUMBER screen displays. (See Figure 3.)
Figure 3
-
Enter the case number for the case - including the hyphen.
- Click on the [Next] button to continue.
NOTE: You may use the browser's [Back] button at any time during this process to verify former screens until the final submission.
STEP 4 The Document/Event Selection screen displays next. (See Figure 4 and 4a.)
|
|
|
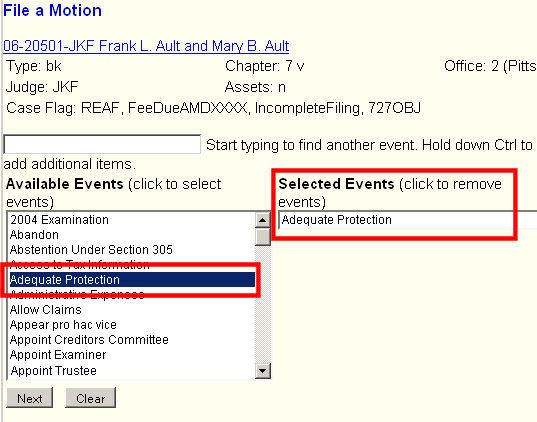
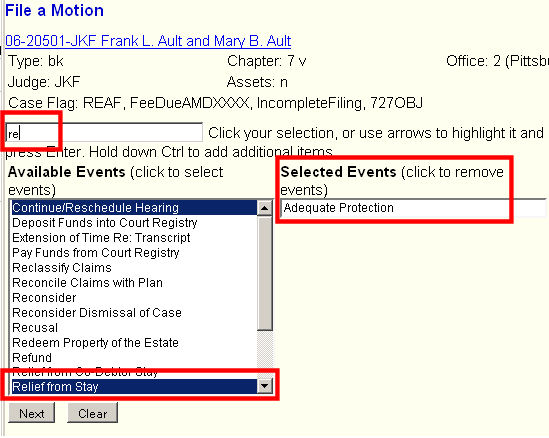
Figure 4c
- First, verify that you are working on the correct case.
- Since this is a multi-event filing, you need to select both/all events.
- Click to highlight Adequate Protection as seen in Figure 4 - which is the first of the two events.
- Click in the event search Box and type the first couple letters of the second event; "re" in this case.
- Scroll down the Event List until Relief from Stay is viewed,
-
Hold down your [Ctrl] key on Relief From Stay as seen in Figure 4a and then release the Ctrl key.
The two events are thus are selected for this filing as can be seen in Figure 4c above.
NOTE: Any event(s) to be filed must appear in the Selected Events box.
- Click on the [Next] button to continue.
STEP 5 The Joint Filing screen displays. (See Figure 5.)
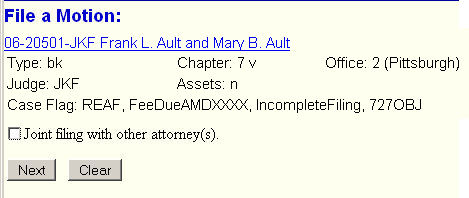
Figure 5
- If this is a joint filing with another attorney(s), clicking in the checkbox and clicking on Next will generate a screen where you will be presented with a pick list of attorneys currently on the case to select as joint filer(s).
- Click on the [Next] button to continue.
STEP 6 The Select the Party screen displays. (See Figure 6.)
Figure 6
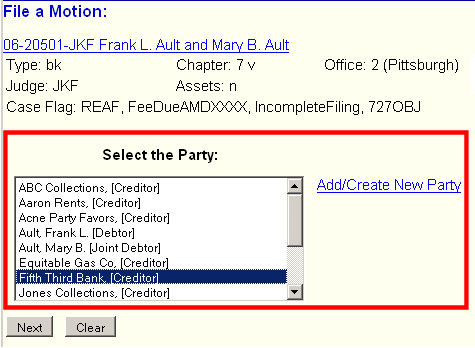
-
If the party you represent is not listed, it must be added. Click the Add/Create New Party hyperlink.
See the Search Process for more detail.
NOTE: When adding a party, be sure to change their Role field to Creditor.
- If you added a party, upon returning from the Party Information screen, that party is temporarily placed first in the party list. The next time you file on this case and view the party list, that party will be listed in proper alphabetical order. (See Figure 6a.)
Figure 6a
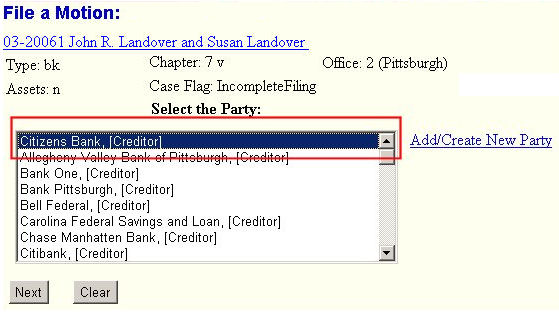
- If the party you represent is in the list, or was just added to the list, click on that party's name.
- Click on the [Next] button to continue.
STEP 7 The Attorney/Party Association screen appears. (See Figure 7.)
Figure 7
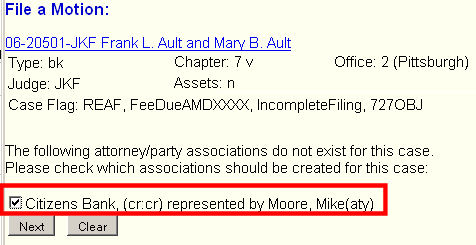
-
Click in the checkbox to establish the association with your client.
- Click on the [Next] button to continue.
STEP 8 The Select a pdf document screen displays. (See Figure 8.)
Figure 8
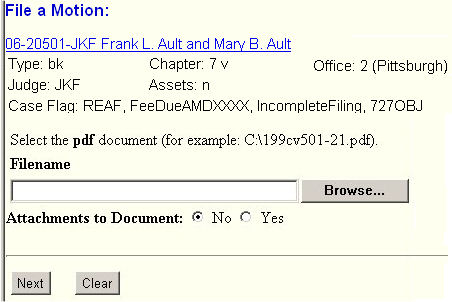
- View the Browse Process for detail on identifying the pdf file with the motions.
-
Click the Yes radio button to the right of the Attachments to Document prompt to attach the proposed order.
See the Attachment Process for more detail on attaching additional pdf files. - Click on the [Next] button to continue.
STEP 9 The Fee Payment screen screen displays. (See Figure 9.)
Figure 9
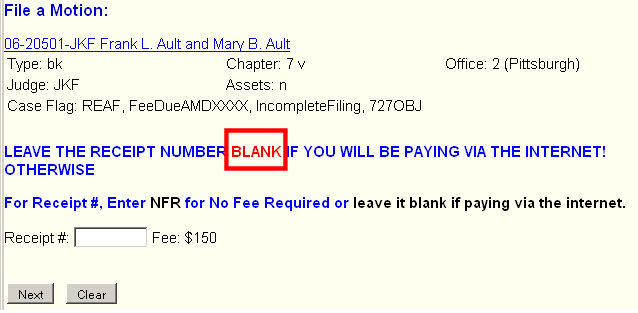
-
Leave the Receipt # field blank unless no fee required.
- Click on the [Next] button to continue.
STEP 10 The Modify Docket Text screen appears. (See Figure 10.)
Figure 10
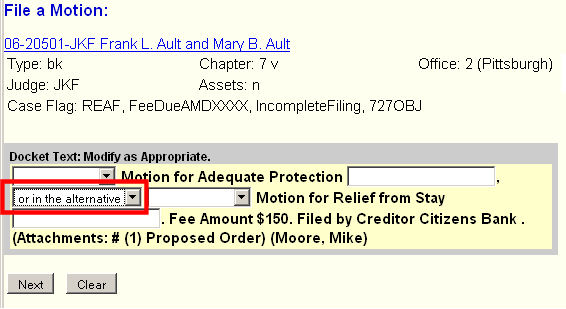
- If appropriate, choose a prefix such as Emergency from the Prefix text pick list for each motion.
- Enter any text in the text box for each motion that you feel is needed for clarification or enhancement.
- Select the appropriate connector text; "or in the alternative" for this pair of events.
- Click on the [Next] button to continue.
STEP 11 The Final Docket Text screen displays. (See Figure 11.)
Figure 11
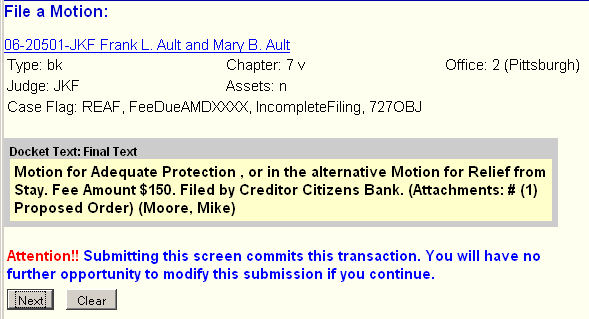
- Carefully verify the final docket text. This is your last chance to change this entry before addition to the case.
- If correct, click on the [Next] button to continue.
- If the final docket text is incorrect: Click the browser [Back] button to find the screen to be modified.
- Correct the erroneous/missing entry and then resubmit that screen.
- After correcting and resubmitting all subsequent screens, click on the [Next] button to continue.
- To abort or restart the transaction, click the Bankruptcy hyperlink on the Menu Bar.
STEP 12 The Notice of Electronic Filing/Receipt screen displays. (See Figure 12.)
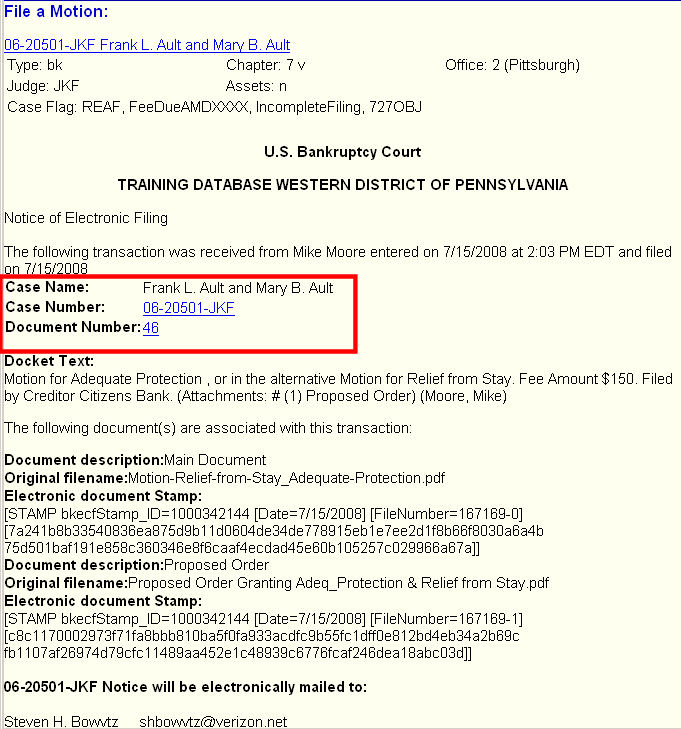
Figure 12
- Clicking on the case number hyperlink on the Notice of Electronic Filing will take you to PACER to login and then present the Docket Report for this case.
- Clicking on the document number hyperlink will take you to PACER to login and then present the PDF image of the petition just filed.
- To print a copy of this receipt click the browser's [Print] icon.
NOTE: Any party that to whom you might need to serve this pleading that is listed in the Notice will be electronically mailed to: section will get automatic email notification. Any part to be served listed in the Notice will not be electronically mailed to: would have to be served by paper.
Return to the Topics in Alphabetical Order page.