Opening an Adversary proceeding involves entering the necessary information regarding the plaintiff, defendant, and basic statistical data. The complaint is incorporated into this process and will not need to be docketed separately. At this time when the filer is an attorney, they must also be added as a party to the case by associating themselves with the plaintiff(s) they represent. This is the only time this process is required. (Refer to Step 5.)
STEP 1 Click the Adversary hyperlink on the CM/ECF main menu bar. (See Figure 1.)
Figure 1
STEP 2 The ADVERSARY EVENTS screen displays. (See Figure 2.)
Figure 2
- Click the Open an AP Case hyperlink.
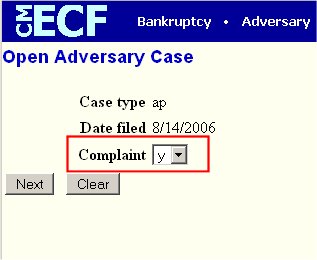
STEP 3 The CASE DATA screen displays. (See Figure 3.)
Figure 3
- The case number will be generated at the end of this process.
- The current date is displayed next to Date filed. This date cannot be altered.
- The Complaint field signifies the lead event for this proceeding.
This will always be "y" unless you are filing Notice of Removal where you would select (n) for no.- Click the [Next] button to continue.
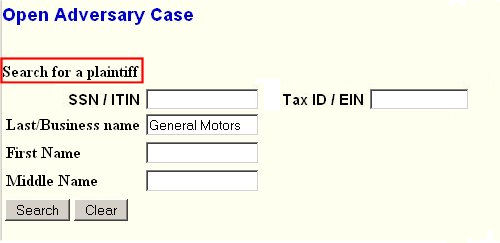
STEP 4 The Search for a party screen appears. (See Figure 4.)
Figure 4NOTE: Searching when opening an Adversary involves the same mechanics as when opening a Bankruptcy case. It must be remembered that for an Adversary, at least one of the plaintiffs or defendants must be debtors in an existing Bankruptcy case - thus that party would be found by the search. You would never have to add (create new party) all parties to an adversary.
- Here we search the database for the plaintiff - or the first of the plaintiffs.
- Enter the last name or the first few characters of the individual's Last Name or Business name to search. The First Name and Middle Name fields are availible if that information is known. Click on the [Search] button to initiate the search.
See the Search Process for more detail on searching.
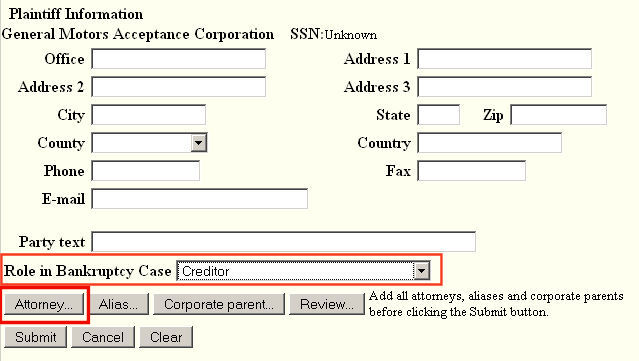
STEP 5 After adding/selecting the (first) plaintiff, complete the Plaintiff Information screen. (See Figure 5.)
(Figure 5)
- If you wish to designate a Corporate parent ; do that here.
- Use the Attorney... button to add yourself as the Plaintiff's attorney.
(See the Attorney Association Process for details.)- Enter the role this plaintiff plays in the bankruptcy case - here Creditor.
- Use the Review... button to see more data on this party.
- Click the Submit button to complete the process.
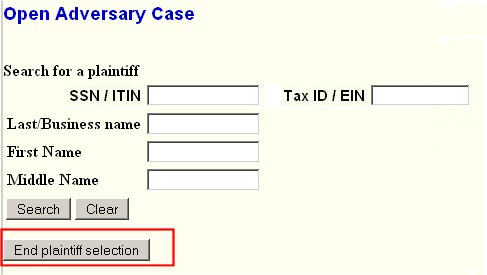
STEP 6 The modified Search for a plaintiff screen is now displayed.
(See Figure 6.)
Figure 6
- If there is another plaintiff, search for them as shown in STEP 5.
- If all plaintiff's have been identified, click on the End plaintiff selection button.
STEP 7 Now the Search for a defendant screen is displayed. (See Figure 7.)
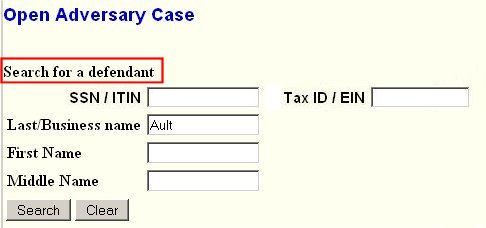
Figure 7
- Use this screen to search for the (first) defendant. (See the Search Process for details.)
- For this example, our defendants have the last name of "Ault."
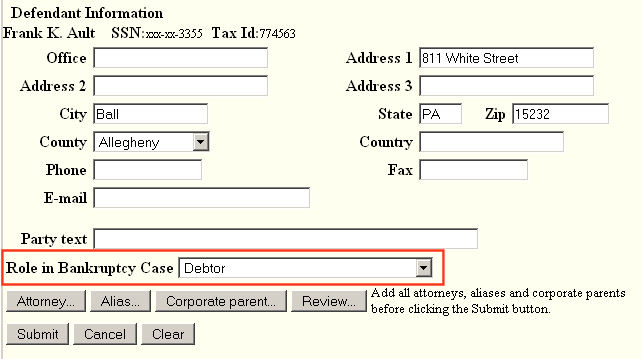
STEP 8 Now the Defendant Information screen is displayed. (See Figure 8.)
Figure 8
- Here we see our first defendant, Frank L. Ault, displayed in the Defendant Information screen.
Note: We always need an addresses for the defendant(s) so the summons can be mailed to them. If the
displayed information is out of date, correct it; if missing, enter it.
- Enter the role this defendant plays in the bankruptcy case - here Debtor.
- Do not associate anyone as the defendant's attorney!!
- Click on the Submit button once finished.
STEP 9 The modified Search for a defendant screen is displayed. (See Figure 9.)
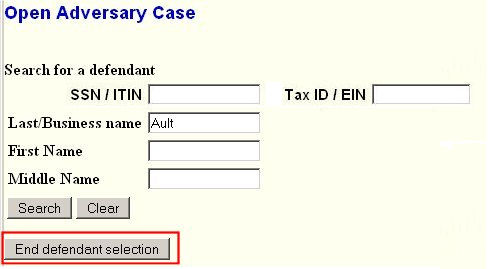
Figure 9
- If there is another defendant, search for them as shown in STEP 8.
- In this example, we would search for "Mary Ault".
- After submitting Mary's information, we get back to this screen.
- Once the defendant's have been identified, click on the End defendant selection button.
STEP 10 The Statistical data screen is displayed. (See Figure 10.)
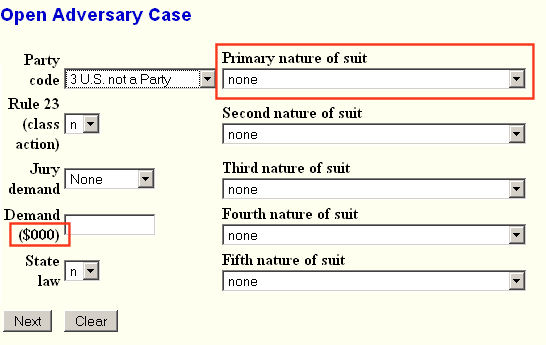
Figure 10
- Verify and/or select the correct value for the fields
- A Primary nature of suit must be selected.
Note: If the nature of this adversary is Objection Discharge or to Dischargeability, select that as the Primary and any others as Second,
Third, etc. nature(s).
- A Secondary nature through Fifth nature are entered if applicable.
- Generally, leave Rule 23 (class action) as n.
- Enter a monetary demand if present in the Demand ($000) field.
- Click on the Next button to continue.
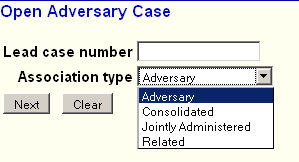
STEP 11 The Lead case number screen is displayed. (See Figure 11.)
Figure 11
- Enter the Lead Bankruptcy Case Number in yy-nnnnn format, including the hyphen.
NOTE: The system does not verify that this is the correct case. Thus be very careful that you enter the correct case number so the complaint is docketed on the correct lead/associated case.
If the Lead case number entered is invalid, an error message, “YY-NNNNN is not a valid case. Please enter a valid value.” is generated. You will not be able to proceed with the case opening process. Research the reason for the error.
- If you do not enter any number in the Lead case number field the system will allow you to proceed with case opening.
- Select the correct value in the Association Type field. The.default of Adversary is valid for any adversary case.
- Click the [Next] button to continue.
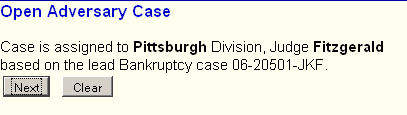
STEP 12 The Division Assign screen appears. (See Figure 12.)
Figure 12
- The system alerts you as to the Division to which it is assigning the case - the assignment is based upon the Division of the lead case.
NOTE: If this Division is wrong, then you entered the wrong Lead Case number on the previous screen. Use the Browser's BACK button to return to the previous screen and correct the Lead Case number and resubmit that screen.
- Click the [Next] button to continue.
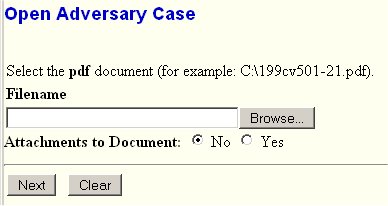
STEP 13 The Select the pdf document screen displays. (See Figure 13.)
Figure 13
- Use the Browse Process to identify the PDF file containing the complaint.
- Change the Attachments to Document to yes to identify the propose order for the complaint. (See Figure 9b.)
- See that Attachment Process for details on identifying the PDF file containing the proposed order.
- After identifying an attachment, or If no attachment, click on the [Next] button to continue
STEP 14 The Receipt #/Filing Fee screen will appear. (See Figure 14.)
Figure 14
- Leave Receipt # field blank to pay online using Pay.Gov!!
NOTE: The Fee field is solid and cannot be changed.
- Enter NFR only if an arrangement to pay using another format has been made
prior to this filing or for any other Court sanctioned reason that no fee is required.
- Click on the [Next] button to continue.
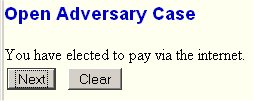
STEP 15 The Internet Payment Confirmation screen displays. (See Figure 15.)
Figure 15
- This message reminds you of the upcoming Internet Payment module.
- Click on the [Next] button to continue.
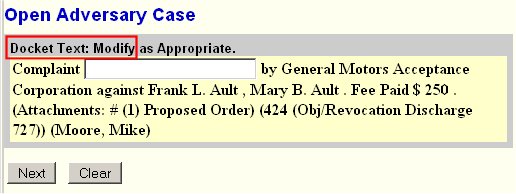
STEP 16 The MODIFY TEXT screen displays. (See Figure 16.)
Figure 16
- Additional text can be typed in the Enhance text window.
- As always, at this point you can still go back to previous screens to correct any errors.
- Note the Attachments portion of the text confirming that you did identify additional pdf files.
- Click on the [Next] button to continue.
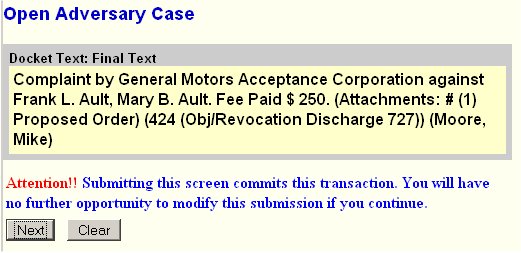
STEP 17 The Final Docket Text screen displays. (See Figure 17.)
Figure 17
- Proof this screen carefully! No further editing in the case opening process is allowed after this screen.
- If any part of it is incorrect, click the browser [Back] button to return to the screen you need to correct. Then process the screens again with the respective [Next] or [Submit] buttons.
NOTE: When an adversary is opened, the complaint information is spread over to the main bankruptcy case.
- When the judgment is rendered, the ruling will also spread over to the main bankruptcy case.
NOTE: To abort or restart the transaction at any time up until the final docket text screen, click the Adversary hyperlink on the Menu Bar.
- Click on the [Next] button to continue.
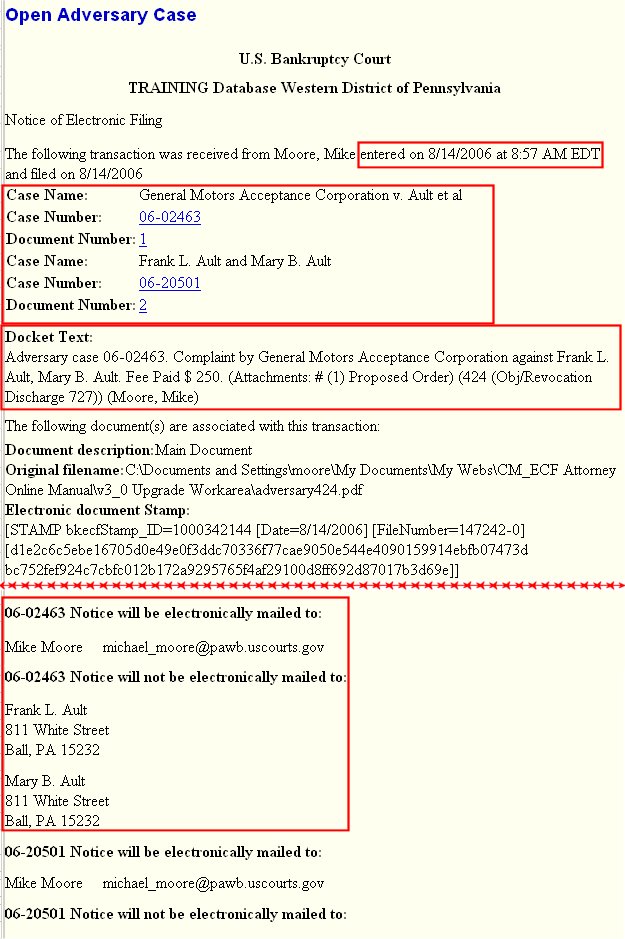
STEP 18 The Notice of Electronic Filing (NEF) appears.(See Figure 18.)
Figure 18
- The NEF is verification that the filing has been sent electronically to the court’s database. It certifies that this is now an official court document.
- Here we see two case numbers: the first being the new Adversary case number and second the lead/related Bankruptcy case.
- Each listed case number is a hyperlink to the docket sheet and clicking on the document number hyperlink will display the image of the complaint. The hyperlink to the imaged complaint is also accessible from the bankruptcy case.
- To print a copy of this notice, use your browser's [Print] function.
- To save a copy of this receipt, use your browser's [File] function.
- Trustee and Attorney users will have access to the NEF at the time of their filing.
- When a copy of the NEF is emailed to each subscriber on the case, the following message will display at the top:
***NOTE TO PUBLIC ACCESS USERS*** Judicial Conference of the United States policy permits attorneys of record and parties in a case (including pro se litigants) to receive one free electronic copy of all documents filed electronically, if receipt is required by law or directed by the filer. PACER access fees apply to all other users. To avoid later charges, download a copy of each document during this first viewing. However, if the referenced document is a transcript, the free copy and 30 page limit do not apply.
Return to the Topics in Alphabetical Order page.
Text Size: