A creditor matrix contains the names and addresses of creditors. This information is used for noticing and also for claims information, when applicable. The creditor matrix must be in an ASCII text format, usually a ".txt" file, before it can be successfully uploaded. Refer to Text File Creation for details on creating a text file. All other file uploaded to CM/ECF must be in the portable document format (PDF) format. The steps for uploading a list of creditors are described below.
For details on the correct format of the matrix, see the Mailing Matrix Format module.
Note: With the advent of electronic filing of Claims, users are now allowed to utilize the Upload a creditor matrix file feature multiple times. If you choose to utilize this feature, each file uploaded must contain unique creditors and not an updated list. You must also file the Amended Schedule(s) electronically before uploading another matrix file. Now that you can upload a matrix even if there are existing creditors on the case, you would get an alert message in that situation. (See details below.)
If you have a small number of creditors to add, you can now use the Creditor Maintenance hyperlink off of the Bankruptcy Events menu to add the creditors one-at-a time - and of course, as stated above, only do so after filing the Amended Schedule(s) electronically.
For detail on adding additional creditors, see the Additional Creditors Process
STEP 1 Click on the Bankruptcy hyperlink on the CM/ECF Main Menu bar. (See Figure 1.)
![]()
Figure 1
STEP 2 The Bankruptcy Events menu displays. (See Figure 2.)
Figure 2
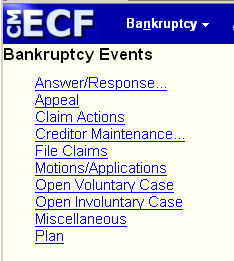
- Click on the Creditor Maintenance... hyperlink.
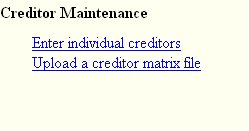
STEP 3 The Creditor Maintenance menu displays. (See Figure 3.)
Figure 3.
-
Click on the Upload a creditor matrix file hyperlink.
(See the Add Creditor Process for details on the Enter individual creditors feature.)
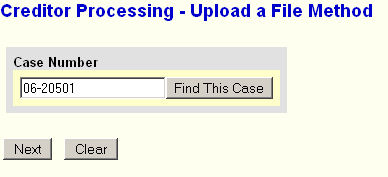
STEP 4 The Case Number prompt is displayed. (See Figure 4.)
Figure 4.
-
Enter the case number
- Click on the [Next] button to continue.
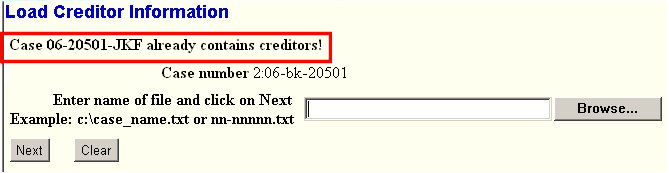
STEP 5 The Load Creditor Information screen will display. (See Figure 5a1 for case with no creditors.)
(See Figure 5a2 for case with existing creditors.)
Figure 5a1.
Figure 5a2.NOTE: It is very important that you verify that you have entered the correct case number. The system will not check for you. If you have entered an invalid case number, click the browser’s [Back] button and enter the correct number.
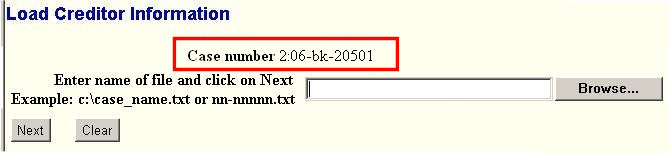
- See the Browse Process for more detail on identifying the text file containing the addresses.
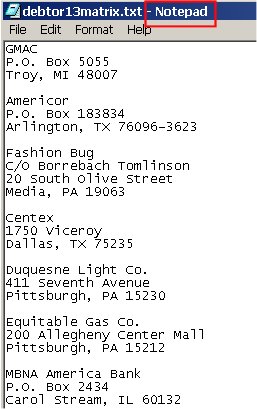
Note: When we Open the candidate file to verify that it is the correct file, we are checking both that it is a text file and that it contains the correct creditors for this case. Windows uses the built-in program Notepad to open text files. (See Figure 5c.)
Figure 5c.
- Once the text file has been identified, click on the [Next] button to continue.
STEP 6 The Total Creditors Entered screen appears. (See Figure 6.)
Figure 6.
-
If the total number of creditors entered is not the same as the total number of creditors in the submitted matrix, click the browser’s [Back] button and research the error.
- If the total number of creditors displayed is correct, click on the [Submit] button to complete uploading the matrix.
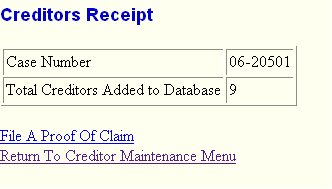
STEP 7 The Creditors Receipt screen displays. (See Figure 7.)
Figure 7.
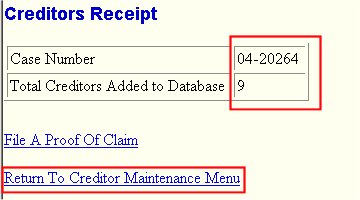
- The information displayed confirms the number of creditors added to the case.
NOTE: Click on the Return to Creditor Maintenance Menu hyperlink to continue and repeat steps 4 - 6 for each creditor matrix.
- If there are no other matrices to add, select Logout or select another option on the Main Menu Bar.
Return to the Topics in Alphabetical Order page.